
Quilt Mockups Using Photoshop – A Tutorial
A few things before I begin...
• I use Photoshop CS3 for my quilt mockup/pattern designs, but there are a variety of software options. Those include the lesser expensive Photoshop Elements and the free GIMP editing program. Photoshop also has a free trial download.
• The following instructions were written using Photoshop CS3 on a MAC computer. If you use a different version of Photoshop, GIMP or a PC, your program will look slightly different. But you should be able to do the exact same things I do here.
• The screenshots posted correspond to the step just below the image.
• This is not meant to be a beginners guide to all things Photoshop. I do assume some level of computer knowledge, although I also did try to write things out in very detailed, step-by-step format. It will take you a bit of time to be comfortable using Photoshop. But I am proof that it can be done. I am self taught and have been using it for over 10 years. Still, even I have a lot to learn. There are lots of great tutorials online and how-to books. Stick with it and you will be successful!
• You may link to this tutorial on your site and/or blog, but do not copy text or images from this tutorial to your site and/or blog. You may use this tutorial for teaching workshops but please direct your students to this blog to print out their own copies. Do not print out copies yourself and provide them in the class. When in doubt, contact me with any questions. I am nice regular person just like you, I promise!
Let's get started!
Quilt Mockups Using Photoshop – A Tutorial
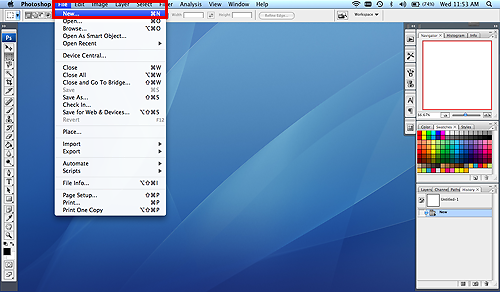
1. Open Photoshop and create a new canvas by clicking on File --> New.
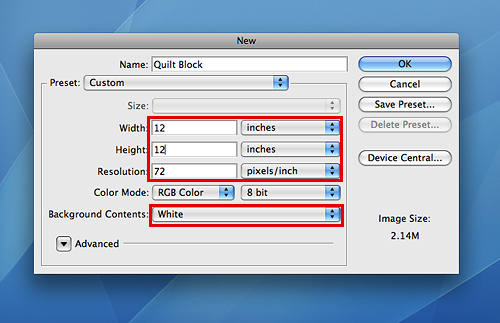
This quilt uses 12"x12" quilt blocks. In the New File window, enter/select the following values:
• Width and Height: 12 inches. Don't forget to select inches from the drop down boxes. This will probably have defaulted to pixels.
• Resolution: Set your resolution to 72 pixels/inch. If you plan on using these graphics for print, you can set this to 300 pixels/inch.
• Background Contents: White
Click OK. You just created the canvas for your first quilt block and I will refer to this canvas as the Quilt Block 1 Canvas. Now let's add the "fabric" piecing.
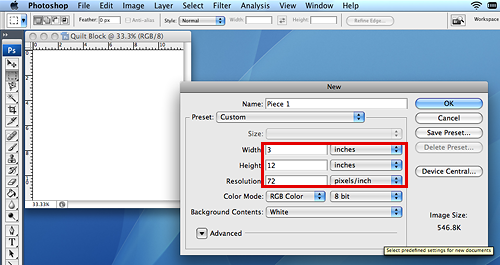
2. Following the same directions as Step 1, create another new canvas that is 3" x 12". This will be your first "fabric" piece and I will refer to this canvas as Fabric Piece 1 Canvas.
3. You should have a toolbar on the left of your screen. If for some reason you don't see that bar, make sure it is selected to appear by selecting Window from the top menu, and ensuring Tools is selected.
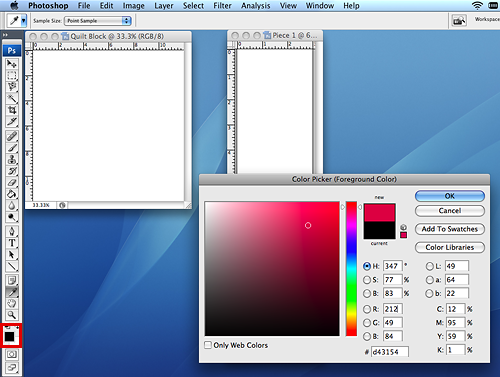
At the bottom of that toolbar, there is a little black and white block graphic (seen in the above screenshot with the red box around it.). That graphic shows the foreground and background color of whatever tool you use (paintbrush, paint bucket, text tool, etc.) The default setting is black foreground and white background.
Click on this icon and a Color Picker dialog box appears. Using your cursor, select a color and click OK.
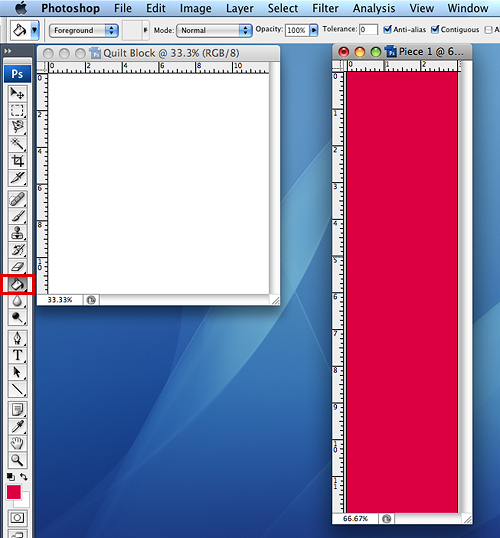
4. From the toolbar on the left side of the screen, select the Paint Bucket icon. Your cursor will become a paint bucket. Move your cursor over the Fabric Piece 1 Canvas and click. The canvas will be filled with the new color.
** NOTE: If you don't see this icon, don't panic. It is "hiding" under another icon. If you see a Gradient Tool icon in the left toolbar, double click on it and then select the Paint Bucket icon from the list that appears. Again, I am using Photoshop CS3 and these are the groupings in the toolbar for that version. If you are using another tool, the groupings may be different. Double click on various tools in the toolbar and you can explore all the listings and find the paint bucket. **
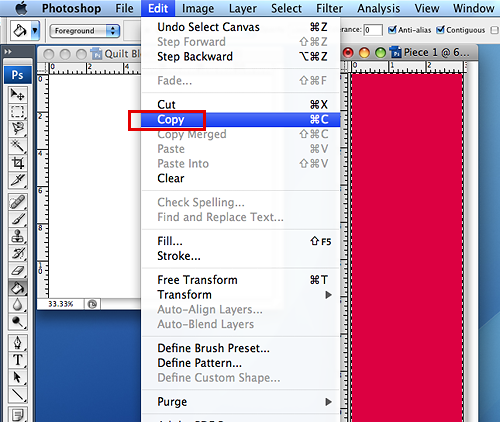
5. Now we will place the Fabric Piece 1 Canvas on to our blank 12" x 12" Quilt Block 1 Canvas. On the top toolbar, select Select --> All. Next, on the top toolbar, select Edit --> Copy.

6. Click on the 12" x 12" Quilt Block 1 Canvas we made in Step 1. Then, on the top toolbar, select Edit --> Paste.
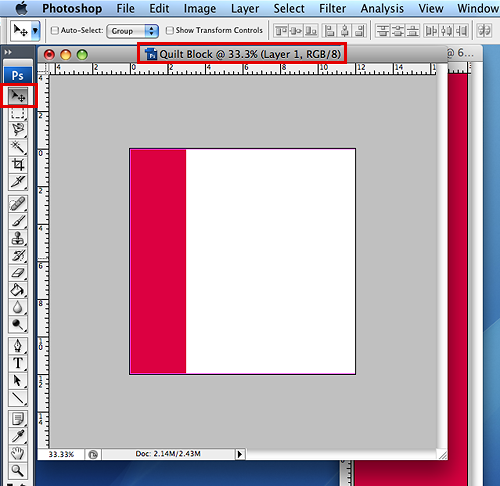
The Fabric Piece 1 Canvas is pasted onto your Quilt Block 1 Canvas. Congratulations! You just created your first Photoshop Layer on the Quilt Block 1 Canvas. Using the Arrow tool in the left toolbar, you can move the piece you pasted around the canvas. I put it on the left side of the block.
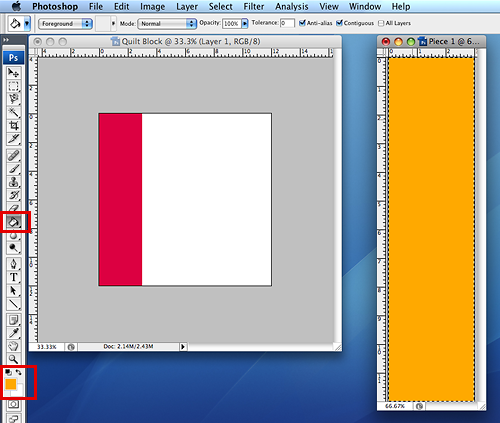
7. Go back and select the 3" x 12" canvas. Using the same technique from Step 4, select a new color from the Color Picker and use the Paint Bucket tool to change the color. I will refer to this canvas as Fabric Piece 2 Canvas.
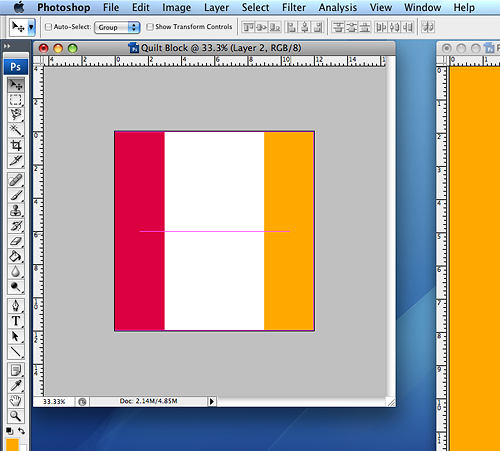
Just like in Step 5 and 6, copy and paste Fabric Piece 2 Canvas again to the Quilt Block 1 Canvas. You just created a second Photoshop Layer.
8. Next, create one more new canvas for another "fabric" piece. Following the directions in Step 1, create a new 6" x 3" canvas. I will refer to this canvas as Fabric Piece 3 Canvas.
Use the Paint Bucket tool to paint it yellow, and copy and paste 2 of these Fabric Piece 3 Canvases to the Quilt Block 1 Canvas. Move one to the top of the block and one to the bottom of the block.

9. I've mentioned that each time you paste something to the Quilt Block 1 Canvas, you are adding a new layer to the image. These layers appear in the Layers window of Photoshop.
** NOTE My Layers window is highlighted in red on the bottom right of the screenshot above. If you do not see a Layers window, ensure it is set to appear by selecting from the top toolbar Window --> Layers.
Next, we will prepare the Quilt Block 1 Canvas for copying over to a larger Final Quilt canvas. To do this, we want to combine all the layers into 1 layer. (Just trust me on this one. ;)) With the Quilt Block 1 Canvas window active, select Layer --> Flatten Image from the top toolbar.
10. This sample contains 2 quilt block designs. We just created the first design (Quilt Block 1 Canvas), now let's create the second design. This will be a simple white block, with a color square in the center. I will refer to this second block as Quilt Block 2 Canvas.
First, repeat Step 1 and create a new 12" x 12" canvas with a white background.

11. Now creation another new canvas for the "fabric" piece. Again following the directions in Step 1, create a new 6" x 6" canvas. I will refer to this canvas as the Fabric Piece 4 Canvas.
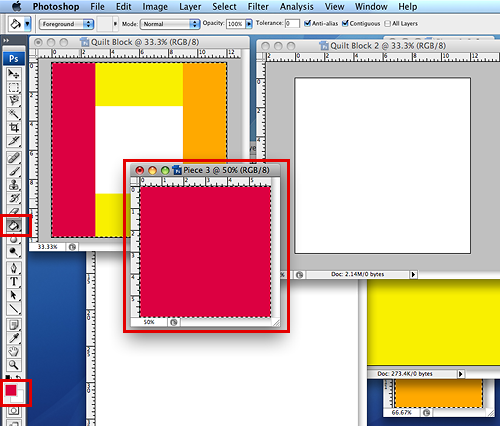
12. Following the directions from Step 4, use the Color Picker and Paint Bucket tool to fill in the Fabric Piece 4 Canvas.
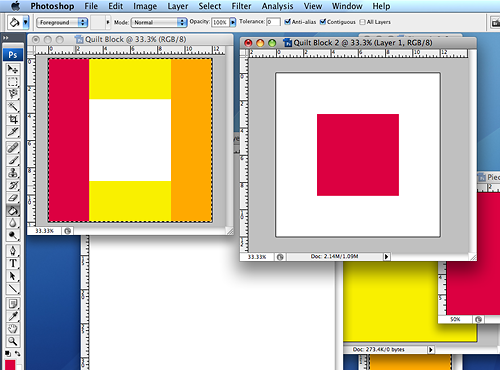
13. Following the directions in Step 5 and 6, copy and paste the Fabric Piece 4 Canvas to the new blank quilt block, the Quilt Block 2 Canvas.
14. Flatten the Quilt Block 2 Canvas, just as you did in Step 9 for your first quilt block.
15. Now that we have a couple quilt blocks, let's make a new canvas for the entire quilt. In this example, our quilt is 3 blocks wide and 3 blocks tall. Just like in Step 1, create a new canvas, 36" wide and 36" tall, with a white background. I will refer to this canvas as the Final Quilt Canvas.
16. Using the same copy and paste techniques from Step 5 and Step 6, select each quilt block canvas you made and copy and paste the blocks to your new Final Quilt Canvas. Because you flattened the image layers earlier, you will be selecting the entire image, and not just a single layer, or "fabric" piece.
Once you paste your quilt block to the Final Quilt Canvas, use the arrow tool to move the block around the canvas.
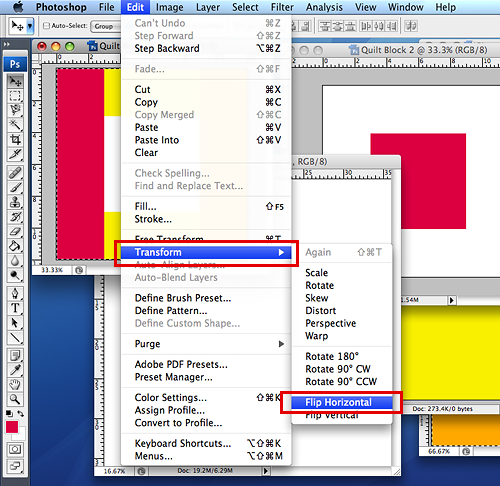
17. You probably notice that in my sample, some of my blocks with the colorful fabric ring are flipped and/or rotated. This is a simple way to change the look of a block without creating an entirely new block from scratch.
Select the Quilt Block 1 Canvas. Select Edit --> Transform from your top toolbar. You will see options to rotate your image 90 degrees, 180 degrees, flip horizontal, flip vertical, etc. Once you rotate your quilt block, you can copy and paste it to the Final Quilt Canvas for more variety.
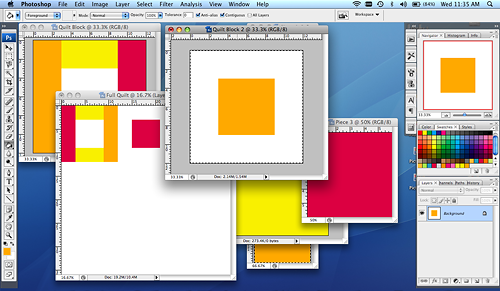
18. You probably also see that on my blocks with the colorful center, I have decided to change the color in some blocks. This can also be easily accomplished with the Paint Bucket tool.
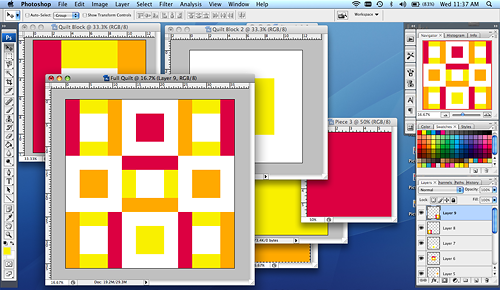
19. Once you have copied and pasted 9 blocks to the Final Quilt Canvas, you will see your completed mockup.
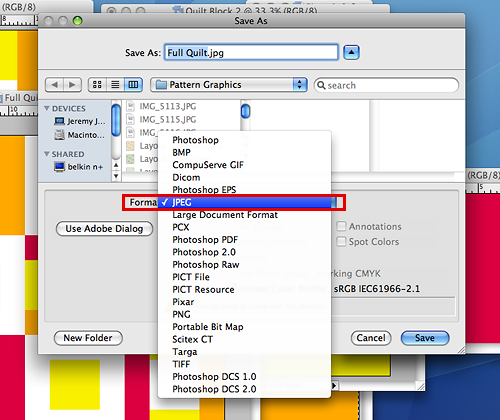
20. Save your file as a jpg by selecting File --> Save As and selecting JPEG from the dropdown list. Click Save.
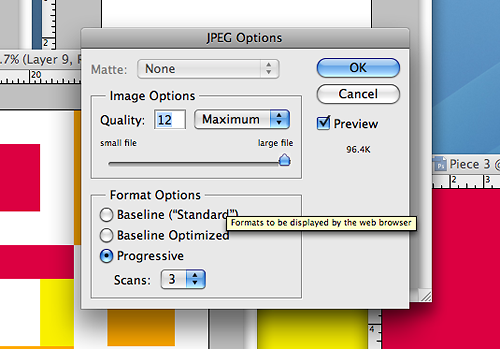
21. You will be prompted to set a file image quality - determining the final file size. I set this to 12 usually, the highest quality.
** Final Notes **
• To shrink your image down to a smaller size to post on your blog, open the JPG file up using Photoshop. From the top toolbar, select Image --> Image Size. Set the desire size. I post images on my blog that are 500px wide.
• If you love your design and want to make it into a quilt, do not forget to add seam allowances to your pieces! For 1/4" seam allowances, add 1/2" to the height and width of each "fabric" piece you created when cutting out your fabric.