
Lighthouse Quilt Along Week 2: Test Block Assembly

Lighthouse Quilt Along by Fresh Lemons Quilts
Welcome to Week 2 of the
! Today we are going to make our first quilt block, which I usually think of as a test block. I always like to make 1 quilt block (or even just sew 1 of each template in a foundation paper piecing pattern) before ordering and cutting all my fabric.
Why? When paper piecing a block, people have different comfort levels with the amount of fabric needed. Those that are very experienced with paper piecing may need less fabric to achieve their finished block. Those that are new to the process might require a little more. I always try to write my patterns and tutorials with beginners in mind though, so hopefully these fabric cuts will work for everyone. But again, I like to make 1 block first before cutting into fabric for an entire quilt.
After we make our first block, we will talk about determining how much fabric you need for your quilt.
Let's get started!
Lighthouse Quilt Block Tutorial
Please note, all seams are 1/4″; Final block size 8 1/2″ x 8 1/2" unfinished Reduce your stitch length so that the paper template will perforate easily. I used 1.4 stitch length.
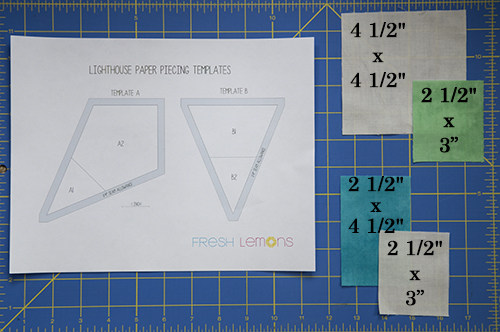
Paper Piecing Templates Print 4 of the Paper Piecing Template below. Be sure to print them at 100% or "Actual Size" and check the scale icon with a ruler before starting.
Lighthouse Foundation Paper Piecing Template
Prepare the templates. Cut out the templates around the seam allowance line.
Step 1. Cut your fabric. When cutting fabric for paper piecing, you will be cutting pieces that are slightly larger than needed. These are the cutting amounts for completing one Lighthouse Quilt Block.
Lighthouse Quilt Along by Fresh Lemons Quilts
Pattern Piece
Fabric Color
A1
Cut 4
2 1/2” x 3”
Green/Print
A2
Cut 4
4 1/2” x 4 1/2”
White/Background
B1
Cut 4
2 1/2" x 4 1/2"
Turquoise/Print
B2
Cut 4
2 1/2" x 3"
White/Background
Tip: It can be helpful to write the fabric color name on the paper template pieces.
Lighthouse Quilt Along by Fresh Lemons Quilts
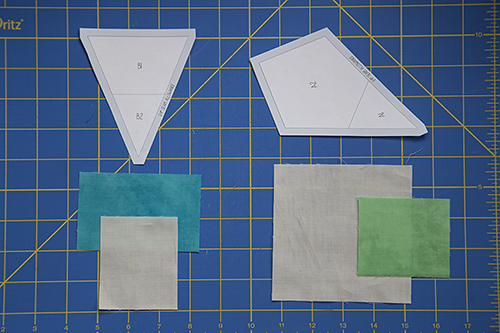
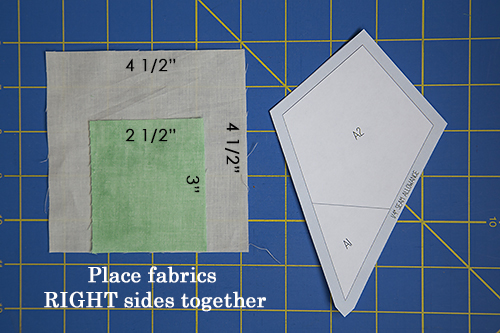
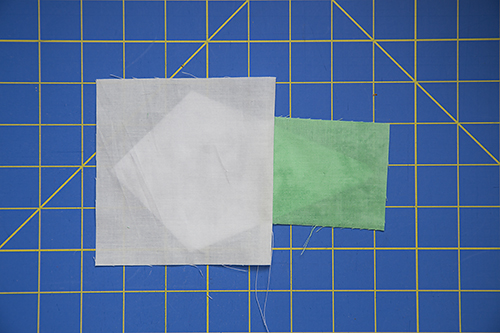
Step 2: Let’s start with Template A. Take your fabric cuts for Template A and place them right sides together. Center the 2 1/2” x 3” Green Fabric rectangle along the edge of the 4 1/2” x 4 1/2” White Fabric square, as shown.
Lighthouse Quilt Along by Fresh Lemons Quilts
Step 3: Place your fabric on the unprinted side of the paper piecing template, covering the entire space of A1 with your Green Fabric rectangle as shown.

Lighthouse Quilt Along by Fresh Lemons Quilts
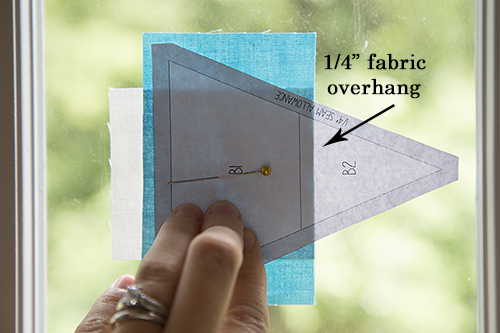
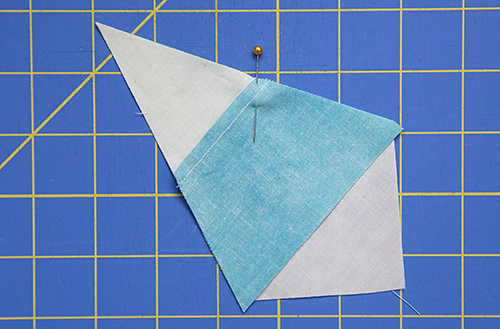
Take your fabric and template and hold them up to the light. I like to use a nearby (um, very dirty) window. Make sure at least 1/4″ of the fabric overlaps into template space A2. This overhang will be your seam allowance. This will probably feel backwards and wrong the first few times you do it. Pin into place.

Lighthouse Quilt Along by Fresh Lemons Quilts
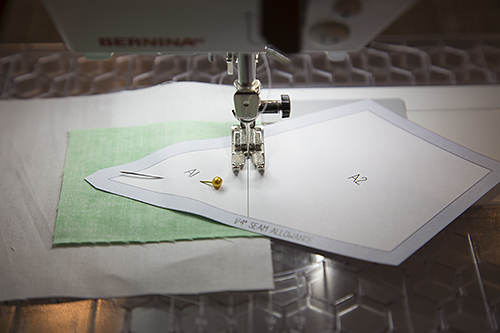
Step 4: Make sure your stitch length is now shortened to something around 1.4.

Lighthouse Quilt Along by Fresh Lemons Quilts
Sew along the seam line on the template between pieces A1 and A2. I also like to backstitch at the beginning and end. Remove your pin.

Lighthouse Quilt Along by Fresh Lemons Quilts
Lighthouse Quilt Along by Fresh Lemons Quilts
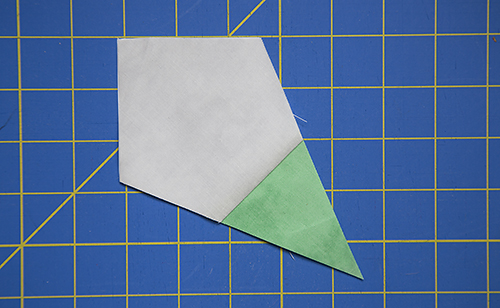
Your block should now look like this:

Lighthouse Quilt Along by Fresh Lemons Quilts

Lighthouse Quilt Along by Fresh Lemons Quilts
Step 5: Turn your template over, open the fabric, and press your seam.
Lighthouse Quilt Along by Fresh Lemons Quilts
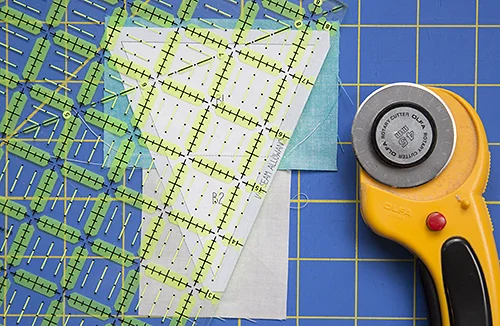
Step 6: Using a quilting ruler and rotary cutter, trim your block around the template. I like to line up the 1/4" markings on my quilting ruler with the lines on the template as shown.

Lighthouse Quilt Along by Fresh Lemons Quilts

Lighthouse Quilt Along by Fresh Lemons Quilts

Lighthouse Quilt Along by Fresh LemonsQuilts
Lighthouse Quilt Along by Fresh Lemons Quilts
Congratulations! You've just finished your first paper piecing template! Next we are going to follow the same process and paper piece Template B.
Step 7: Take your fabric cuts for Template B and place them right sides together. Center the 2 1/2" x 4 1/2" Turquoise Fabric rectangle along the edge of the 2 1/2” x 3” White Fabric rectangle, as shown.

Lighthouse Quilt Along by Fresh Lemons Quilts
Step 8: Place your fabric on the unprinted side of the paper piecing template, covering the entire space of B1 with your Turquoise Fabric rectangle as shown.

Lighthouse Quilt Along by Fresh Lemons Quilts
Take your fabric and template and hold them up to the light. Make sure at least 1/4″ of the fabric overlaps into template space B2. This overhang will be your seam allowance. Pin into place.
Lighthouse Quilt Along by Fresh Lemons Quilts
Step 9: Sew along the seam line on the template between pieces B1 and B2. Remove your pin.

Lighthouse Quilt Along by Fresh Lemons Quilts
Step 10: Press your fabric open and trim as you did with Template A.
Lighthouse Quilt Along by Fresh Lemons Quilts

Lighthouse Quilt Along by Fresh Lemons Quilts
Step 11: You now have completed Template A and Template B. Next we will sew these together to make 1 quadrant of the finished quilt block. Carefully remove the paper from the back of your paper pieced pieces.
Layout your components as shown.

Lighthouse Quilt Along by Fresh Lemons Quilts
Step 12: We are done paper piecing, so you can now change your stitch length back to it's usual setting. Place the pieces right sides together. As you can see, when you fold down your fabric 1/4", your seams will match. Pin in place.

Lighthouse Quilt Along by Fresh Lemons Quilts
Lighthouse Quilt Along by Fresh Lemons Quilts
Step 13: Stitch together and press.

Lighthouse Quilt Along by Fresh Lemons Quilts

Lighthouse Quilt Along by Fresh Lemons Quilts
Step 14: Congratulations, you've finished your first block quadrant! Repeat these steps to piece the other 3 block quadrants.
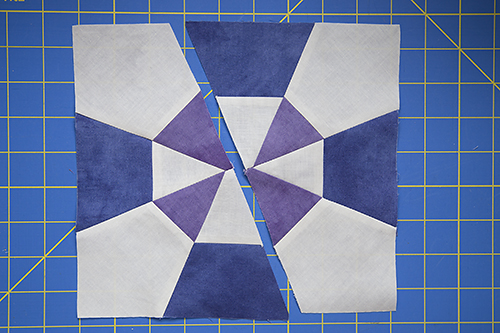
Step 15: Once you have all 4 block quadrants pieced, it's time to sew them together. Please disregard the change of color in my fabrics. I took the photos for this step at a later point in making my finished quilt.
Layout your 4 block quadrants as shown.

Lighthouse Quilt Along by Fresh Lemons Quilts
Step 16: Place 2 block quadrants right sides together. Match your seams and pin. Stitch together and press. Repeat for remaining 2 quadrants.

Lighthouse Quilt Along by Fresh Lemons Quilts
Lighthouse Quilt Along by Fresh Lemons Quilts
Step 17: Place 2 block halves right sides together. Match your seams and pin. Stitch together and press.

Lighthouse Quilt Along by Fresh Lemons Quilts
You're done! Admire your finished Lighthouse Quilt Block

Lighthouse Quilt Along by Fresh Lemons Quilts
Determining Fabric Required
Now that you've made your test block, you should know what size cut fabrics you need for your quilt. We will be determining the fabric requirements based on the tutorial above. Adjust accordingly if you found you needed larger cut sizes for your blocks.
Yep, here comes the math. Brace yourself!
NOTE: My quilt math assumes a yard of fabric is 36" x 42" width of fabric (WOF)
Step 1. Determine the number of pieces you need to cut for your quilt. For each block, you need to cut (4) of each A1, A2, B1 and B2. To determine the number of pieces to cut for your quilt, use the following equation:
Number of Blocks
x 4 = A1 Cuts
Number of Blocks
x 4 = A2 Cuts
Number of Blocks
x 4 = B1 Cuts
Number of Blocks
x 4 = B2 Cuts
I've gone ahead and done the math for you for the sizes we discussed in last week's quilt along post.
Baby Quilt / 25 blocks / 40″ x 40″ Finished / Print 100 Copies of Templates
A1
Cut 100
2 1/2” x 3”
Focal Fabric
A2
Cut 100
4 1/2” x 4 1/2”
Background Fabric
B1
Cut 100
2 1/2" x 4 1/2"
Focal Fabric
B2
Cut 100
2 1/2" x 3"
Background Fabric
Lap Quilt / 63 blocks / 56″ x 72″ Finished / Print 252 Copies of Templates
A1
Cut 252
2 1/2” x 3”
Focal Fabric
A2
Cut 252
4 1/2” x 4 1/2”
Background Fabric
B1
Cut 252
2 1/2" x 4 1/2"
Focal Fabric
B2
Cut 252
2 1/2" x 3"
Background Fabric
Twin Quilt / 88 blocks / 64″ x 88″ Finished / Print 352 Copies of Templates
A1
Cut 352
2 1/2” x 3”
Focal Fabric
A2
Cut 352
4 1/2” x 4 1/2”
Background Fabric
B1
Cut 352
2 1/2" x 4 1/2"
Focal Fabric
B2
Cut 352
2 1/2" x 3"
Background Fabric
Queen Quilt / 132 blocks / 88″ x 96″ Finished / Print 528 Copies of Templates
A1
Cut 528
2 1/2” x 3”
Focal Fabric
A2
Cut 528
4 1/2” x 4 1/2”
Background Fabric
B1
Cut 528
2 1/2" x 4 1/2"
Focal Fabric
B2
Cut 528
2 1/2" x 3"
Background Fabric
King Quilt / 156 blocks / 104″ x 96″ Finished / Print 624 Copies of Templates
A1
Cut 624
2 1/2” x 3”
Focal Fabric
A2
Cut 624
4 1/2” x 4 1/2”
Background Fabric
B1
Cut 624
2 1/2" x 4 1/2"
Focal Fabric
B2
Cut 624
2 1/2" x 3"
Background Fabric
Step 2. Next it's time to calculate how much fabric we need for the focal and background of the quilt. This if where the width of fabric (WOF) measurement of 42" comes in to play.
For each template piece (A1, A2, B1, B2), you need to calculate how many pieces you can cut per WOF strip.
For example, template piece A1 is cut 2 1/2” x 3”. To calculate how many can be cut per WOF strip, use the following equation:
WOF / Length of Template Piece = Number that Fit in WOF
42" / 3" = 14 pieces
Because I know I need 100 cuts of Template A1 for my baby quilt, I need to calculate how many 14 piece strips I need to cut.
100 / 14 = 7.14 (round up to 8)
Now I know I need to cut 8 strips that are each the width of Template Piece A1 (2 1/2") to account for all 100 A1 cuts.
8 strips x 2 1/2" = 20"
This means I need a total of 20" x 42" (WOF) to account for all A1 pieces in my Baby Sized quilt. If I am using a scrappy layout, or multiple colors, that is the amount of fabric I need in TOTAL.
Using these equations, I've determined the amount of TOTAL fabric needed for the basic sizes of quilts that we covered last week.
Baby Quilt / 25 blocks / 40″ x 40″ Finished / Print 100 Copies of Templates
A1
20" x 42" (WOF)
Focal Fabric
A2
54" x 42" (WOF)
Background Fabric
B1
30" x 42" (WOF)
Focal Fabric
B2
20" x 42" (WOF)
Background Fabric
Lap Quilt / 63 blocks / 56″ x 72″ Finished / Print 252 Copies of Templates
A1
45" x 42" (WOF)
Focal Fabric
A2
126" x 42" (WOF)
Background Fabric
B1
70" x 42" (WOF)
Focal Fabric
B2
45" x 42" (WOF)
Background Fabric
Twin Quilt / 88 blocks / 64″ x 88″ Finished / Print 352 Copies of Templates
A1
65" x 42" (WOF)
Focal Fabric
A2
180" x 42" (WOF)
Background Fabric
B1
100" x 42" (WOF)
Focal Fabric
B2
65" x 42" (WOF)
Background Fabric
Queen Quilt / 132 blocks / 88″ x 96″ Finished / Print 528 Copies of Templates
A1
92 1/2” x 42” (WOF)
Focal Fabric
A2
265 1/2" x 42" (WOF)
Background Fabric
B1
147 1/2" x 42" (WOF)
Focal Fabric
B2
92 1/2” x 42” (WOF)
Background Fabric
King Quilt / 156 blocks / 104″ x 96″ Finished / Print 624 Copies of Templates
A1
112 1/2” x 32” (WOF)
Focal Fabric
A2
315” x 42” (WOF)
Background Fabric
B1
175" x 42" (WOF)
Focal Fabric
B2
112 1/2” x 32” (WOF)
Background Fabric
To determine yardage for the above amounts, simply divide the first number by 36". For example, if the required fabric amount is 20" x 42" (WOF):
20" / 36" = .555 yards
In which case, I would round up and buy 2/3 yard of fabric.
Now chances are, you are not using the same focal fabric throughout your entire quilt for A1 and B1. That's ok. Now that you know the TOTAL amount needed, you can buy fat quarters, fat eights, etc. Just make sure it adds up to the TOTAL amount of fabric required for each template piece.
You probably are just as exhausted as me after all that math! Don't worry if it takes a bit of time to let it all absorb. Spend the next week determining how much fabric you need for your planned quilt. Go shopping! (Or hunt in your stash). Feel free to get going on the blocks for your quilt top and we will check back in next week.
Happy Sewing Everyone!