10th Anniversary Summer Sampler Series : Rocky Road to Kansas


Our eleventh quilt block for the Summer Sampler Series is the Rocky Road to Kansas. It can be found in Chapter 16, Page 361, Block 2979 of Barbara Brackman’s The Encyclopedia Of Pieced Quilt Patterns.
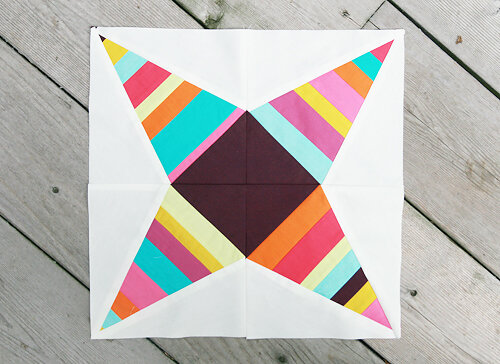
Some quilt blocks are named after the time or event when they first appeared. The Rocky Road to Kansas is such a block, referring to the period of early settlers in late 1800's and their difficult traveling conditions.
I loved this block as soon as I saw it. One of the first quilts I made was a string quilt, and it felt so "modern" and "hip" to me. Well this quilt block just shows that strip and string quilts are not a new design, but have been around for a long time. They were used as a way to use up leftover fabric scraps, let nothing go to waste. So go ahead, channel your inner pioneer, and let's get started on the Rocky Road to Kansas!
Rocky Road to Kansas Quilt Block Tutorial
Please note, all seams are 1/4"
Final block size 12-1/2" x 12-1/2” unfinished
Reduce your stitch length so that the paper template will perforate easily. I used 1.5 stitch length.
FPP = Foundation Paper Piece or Piecing
Prepare Your FPP Templates
Print (4) copies of the Foundation Paper Piecing templates below. Be sure to print them at 100% or “Actual Size”, depending on your printer’s dialog box. Check the scale icon with a ruler before starting.
Cut out the templates around the seam allowance line.
Cut Your Fabric
Step 1. Cut your fabric according to the cutting chart below, matching it up by letter/number to the diagram on the right.

When cutting fabric for FPP, you are cutting fabric pieces that will be larger than needed. The larger the cut in relation to its template location, the more room for error you will have when FPPing your units. I recommend cutting one of each piece as indicated below, making a unit, and ensuring it is enough fabric for your sewing style. Then you can make adjustments later for the rest of your units. These are the fabric sizes I used for my paper piecing.
Cut (4) 6" x 7-1/2” rectangles (Template Piece 1) *
Cut (4) 4" x 7-1/2” rectangles (Template Piece 2)
Cut (4) 4" x 7-1/2” rectangles (Template Piece 3)
Cut (4) 3-1/2” x 5-1/2” rectangles (Template Piece 4)
* I decided to go for the scrappy look, so I cut about (35) strips 6" long, and random widths ranging from 1-1/4" and 2". I sewed the strips together randomly until it was the size of the needed rectangle. Alternatively, you can use striped fabric.
Tip: I like to write the fabric color name on the template pieces so I don't get confused as I'm sewing. Yes, I'm easily confused.
Foundation Paper Piece Your Units
(Note: I’ve updated/cleaned up the templates since I took these photos. They will still make the same block.)
Step 2. If you cut strips for your star, sew the strips together until they are 7-1/2" tall.
Step 3. Take your fabric cut for Template Piece 1 and place it right side out on the back of your template, making sure to cover the entire template space 1. Pin into place.

Step 4. Take your fabric cut for Template Piece 2. Place it right side together to Template Piece 1 which you pinned into place in Step 3. Hold your template up to the light and make sure at least 1/4″ of the fabric overlaps into template space 2.

Step 5. Sew along the seam line on the template between pieces 1 and 2. Remove your pins.

Step 6. Flip your block over.


Trim your seam allowance to 1/4″ using scissors or folding the paper back and using a quilting ruler and rotary cutter.

Press your fabric open.
Step 7. Repeat this process and FPP Template Piece 3 and Template Piece 4 into place.

Step 8. Turn your block over, paper side up, and trim the excess fabric from around the template using a quilt ruler and rotary cutter. Using your quilting ruler, measure 1/4” from the solid inner unit line (not the outer dashed seam allowance line) just in case your template cutting out wasn’t perfect.

Before trimming.

After trimming.
Step 9. Now repeat these steps for the other 3 templates.
At this point, you have the choice to remove your paper or keep your paper on until the end. This is entirely a personal preference. I encourage you to try it both ways to decide what you like best.
If you do remove your paper now, be sure to reset your machine’s stitch length back to normal.

Step 10. Once you have your (4) Foundation Paper Pieced square units, sew them together to create your quilt block. Press your seams open.