
10th Anniversary Summer Sampler Series : Star


Ten years ago, I was SO NERVOUS to post this tutorial for the Summer Sampler Series quilt along. This quilt block was the first Foundation Paper Pieced block of the quilt along. I wasn’t sure how it was going to go for everyone…but guess what? It went GREAT! So this year, I’m excited to post the block. (Note: this time around, you may have FPP something last week!)
This block, simply called Star in Barbara Brackman's Encyclopedia Of Pieced Quilt Patterns can be found on Page 295, Block 2331. Given the vague name of the block, I had a hard time finding too much on its history, but it was featured in the book The Perfect Patchwork Primer by Beth Gutcheon in 1973. This quilt block is a Four X block - it is made by taking a quilt block and dividing it in the shape of an "X" into four sections.
I have a bit of advice before starting this block. First, I recommend reading through this tutorial and even making the sample block. It will really give you a basic understanding of foundation paper piecing. And hopefully put your mind at ease. Second, I recommend reading through the entire tutorial for today's block before starting. And finally, take your time making this one. We will be foundation paper piecing 8 small units and then piecing those together. Ready? Let's get started!
Star Quilt Block Tutorial
Please note, all seams are 1/4"; Final block size 12-1/2" x 12-1/2” unfinished
Reduce your stitch length so that the paper template will perforate easily. I used 1.5 stitch length.
FPP = Foundation Paper Piece or Piecing
Prepare Your FPP Templates
Print (4) copies of the Foundation Paper Piecing templates below. Be sure to print them at 100% or “Actual Size”, depending on your printer’s dialog box. Check the scale icon with a ruler before starting.
Cut out the templates around the seam allowance line.
Cut Your Fabric
Step 1. Cut your fabric according to the cutting chart below, matching it up by letter/number to the diagram on the right.
When cutting fabric for FPP, you are cutting fabric pieces that will be larger than needed. The larger the cut in relation to its template location, the more room for error you will have when FPPing your units. I recommend cutting one of each piece as indicated below, making a unit, and ensuring it is enough fabric for your sewing style. Then you can make adjustments later for the rest of your units. These are the fabric sizes I used for my paper piecing.

Cut (4) 3-1/2" x 7” rectangles (Template Piece A1)
Cut (4) 3-1/2" x 7” rectangles (Template Piece B1)
Cut (4) 4” x 4” squares (Template Piece A2)
Cut (4) 4” x 4” squares (Template Piece B2)
Cut (4) 4” x 10" rectangles (Template Piece A3)
Cut (4) 4” x 10" rectangles (Template Piece B3)
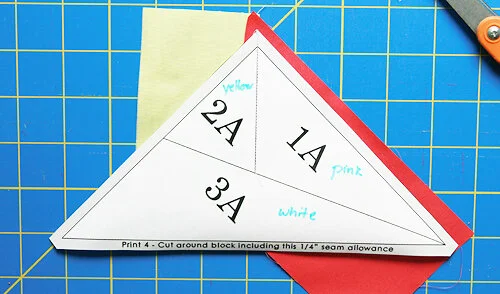
Tip: I like to write the fabric color name on the template pieces so I don't get confused as I'm sewing. Yes, I'm easily confused.
Foundation Paper Piece Your Units
(Note: I’ve updated/cleaned up the templates since I took these photos. They will still make the same block.)
Step 2: Let's start with Template A. Take your 3-1/2" x 7” rectangle fabric cut for Piece A1 and place it right side out on the back of your template, making sure to cover the entire template space A1. Pin into place.

Step 3: Take your 4” x 4” square fabric cut for Piece A2. Place it right side together to Piece A1 which you pinned into place in Step 2. Hold your template up to the light and make sure at least 1/4" of the fabric overlaps into template space A2. This will probably feel backwards and wrong the first few times you do it. :) Pin into place.

Step 4: Sew along the seam line on the template between pieces A1 and A2. Be sure to sew a bit into the seam allowance. I also like to backstitch at the beginning and end. Remove your pins.
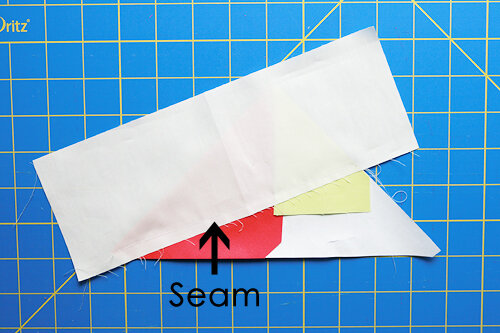
Step 5: Flip your block over. This is what your seam will look like.

Trim your seam allowance to 1/4". You can use scissors, or fold the paper template back and use your quilt ruler and rotary cutter.


Press your fabric open.
Step 6: Turn your block over, paper side up, and trim the excess fabric from around the template using a quilt ruler and rotary cutter. Using your quilting ruler, measure 1/4” from the solid inner unit line (not the outer dashed seam allowance line) just in case your template cutting out wasn’t perfect.
Before Trim

After Trim

Looking better already, right?
Step 7: Take your 4” x 10" rectangle fabric cut for Piece A3. Place it right side together to Piece A1 and A2 which you sewn into place. Hold your template up to the light and make sure at least 1/4" of the fabric overlaps into template space A3. Pin into place.

Step 8: Sew along the seam line on the template remembering again to sew a bit into the seam allowance.

Step 9: Once again, trim your seam allowance to 1/4". You can use scissors, or fold the paper template back and use your quilt ruler and rotary cutter. Press the fabric open.
Before

After
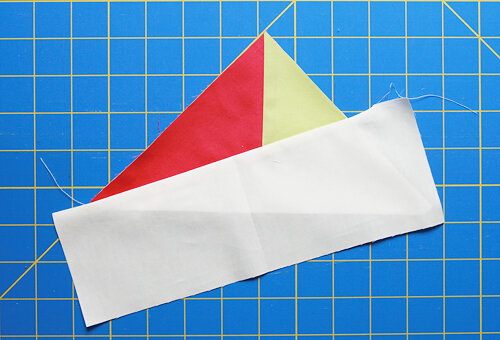
Press the Fabric Open
Step 10: Once again, turn your block over, paper side up, and trim the excess fabric from around the template using a quilt ruler and rotary cutter. Using your quilting ruler, measure 1/4” from the solid inner unit line (not the outer dashed seam allowance line) just in case your template cutting out wasn’t perfect.
Congratulations! You've made your first FPP unit!
Step 11: Now repeat these steps for Template B.
Step 12: Now that you’ve finished (1) Template A unit and (1) Template B unit, let’s sew them together. At this point, you have the choice to remove your paper or keep your paper on until the end. This is entirely a personal preference. I encourage you to try it both ways to decide what you like best.
If you do remove your paper now, be sure to reset your machine’s stitch length back to normal.
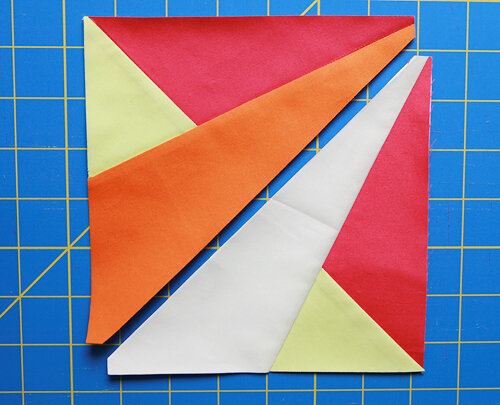
Step 13: Sew Template A and Template B together as you would a half square triangle, by placing the units right sides together and sewing down the diagonal using a 1/4” seam allowance.

Step 14: Repeat this tutorial to create (3) more Template A and Template B units, and sew them together as you did in Step 13. Remember, a shortened stitch length for Foundation Paper Piecing, a normal stitch length once you’ve removed your paper.
Step 15: Once you have your 4 star point square units, sew them together to create your quilt block. Press your seams open.

