This tutorial is a long time coming. Last year at the Sewing Summit, I taught some of you how to sew partial seams. I’ve been using this technique quite a bit lately, between writing the Starfall quilt pattern and my upcoming book. I hope you will find this tutorial helpful – if not today, then in the future when you run across a block needing this technique.
My usual disclaimer…this is how I personally sew partial seams. I am self taught, I’m sure there are a thousand ways to do this. This is mine.
Partial Seams Tutorial
The partial seams technique allows you to partially sew one piece of fabric to another, and then come back at a later point to finish the seam.
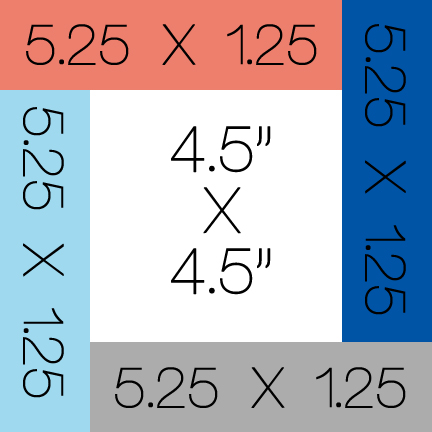
For example, at first glance this block looks like a log cabin. But upon closer inspection, you see that each of the “logs” is the same length (and longer than the center piece). Using partial seams, you can easily sew this together.
If you’d like to work along with this tutorial, cut 1 square and 4 strips as listed below. (These are the cut sizes, not the finished sizes.)
Center Square – Cut (1) 4-1/2″ x 4-1/2″
Side Rectangles – Cut (4) 1-1/4″ x 5-1/4″

1. You can start on any side of the block. I started on the left side and worked clockwise. Place your left strip, right side together with the center block. Align the top edges. As you can see, the strip will hang off the bottom of the block.
2. Sew your seam down the block, stopping and backstitching about 1″ before the end of the square.
Your block should look like this so far:
Press your seams as desired.
3. When you lay your top rectangle against the top edge of the block, you should notice it is now the exact length of the block.
4. Right sides together, sew the top strip on as normal.
Press your seams.
5. Repeat this usual piecing process for the right and bottom strips.
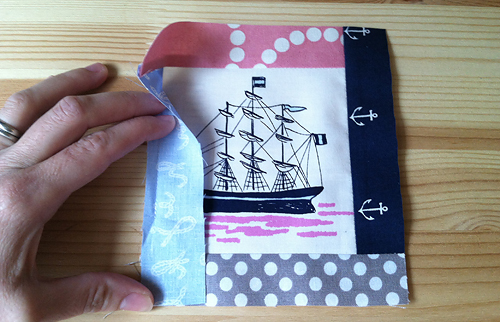
6. Now we are ready to finish the original seam. Fold your unsewn left rectangle back over the sewn block, aligning the unsewn edge. Pin into place.
Starting where you backstitched in Step 2, finish sewing down the seam to complete it. Press your seams.
Congratulations! You just finished your first partial seam block!
Kathleen3
Great tutorial! Thanks for sharing your technique. I love the fabrics you use here, too.
Gertie
Thank you for this tutorial – this looks so much simpler than the bonkers method I had in my head when I have tried to work out how to do this kind of thing in the past. Lovely clear pictures x
Karen Bloemker
Superb instruction writing! Seriously the most concise, easy-to-follow directions ever – thank you!
Evelyn
Thank you for the clear, concise directions — and the pictures as well. Finally I can say I’m willing to do a block with partial seams.
Marla
I never thought to do it this way. Fantastic!
Gemma Roberts
Thank you for this tutorial. I’ve kept clear of partial seems, but now feel happy to have a go with your tutorial next to me and the machine 🙂 x
Mary G
Me, too – I love the look but felt intimidated by it. This tutorial makes it look so easy and “logical”. Thank you.
Bonnie
Oh man, I did sooo many of these when I made a quilt for my husband from his worn out dress shirts! I used the same method you did 🙂
http://bonnieprojects.blogspot.com/2013/02/quilt-from-upcycled-dress-shirts.html
Beth
what a great tute, thanks for sharing
Esther F.
Thank you very much for this tutorial!
The pictures and text are very clear!!!
Angela Baker
Omigosh. That is so easy! Thanks for another great tutorial. We love you, Faith!
Vidya
Thank you so much for sharing. Just this morning I saw a block on a Korean site on fb and was wondering how to make it. This is the very tutorial I needed !
Jen Nelson
Thank you for the great tutorial 🙂
Ben D
Thanks for the tutorial. I like this type of border.
Oh, how I wish I had some of that fabric to make a flag for the “To Boston With Love” project. My one visit to Boston was in 1992 when the tall ships were there in celebration of Columbus’ anniversary.
elsa
So clever ~ great tutorial!
kitty
Thank you so much for this excellent tutorial!! Your concise and clear instructions make it all so easy!!
Dana Harris
You are so smart! Thanks for the tutorial.
Liz DandeliondD
I can’t wait to give this a try.
Thanks for a great tutorial and the wonderful inspiration too.
Gorgeous fabrics.
Jill Daniels
Great tutorial! Thank you for all your great tips!
rosa
Thanks for sharing your tip.Love the fussy cut.
kimwithak
Thank you for a great tutorial!
Looks so obvious (pictures are so helpful!) but it wouldn’t have occurred to me to do it like this!!!
louise
Holy smokes! That’s simple! I had to piece some pieces together for a quilt I made not long ago. Mine was a little more complicated than this. But anyway… Either way, while I was making that one, I tried to figure this out, too. I have thought about this and thought about it, but for some reason have never seen how simple it would be! Perfect! Thanks for sharing.
Hedda
Thanks for the tutorial, I keep seeing patterns that refer to this technique so it will come in handy!
Katy
Too funny, I finally made up my partial seams blocks from SS at the weekend there!
Angela
Thanks for your tutorial! I learned one technique for partial seams just a few days ago…now I know a second method! Always great to have multiple methods in your arsenal!
Have a great day!
Angela
PS. I love your fabric!
Nancy
Faith, you are unbelievable! I am so glad I found you awhile back, have bought several of your patterns. Thank you so much for you absolutely wonderful details in helping this newbee quilter at age 70. I appreciate all your help! Please let me & all us know when you are going to make your book available. Again, thank you! Nancy
Lauren
When I started quilting, I always wondered why log cabin blocks weren’t evenly “logged”, but then I was taught to fear partial seams… You just made it look so simple! Thank you soooo much, I am no longer afraid and can’t wait to try it out!!
Paige
Oh. That’s it? I’ve been afraid of partial seams because they seamed intimidating but I can do this!
Liz
Brilliant! Thanks for the tutorial, this looked so intimidating, who knew it was this simple!
Brenda
Thanks so much for the tutorial. I just bought the modern quilting magazine with your BEAUTIFUL quilt in it. Can you also do a quick tutorial for block C? I just can’t figure it out. 🙁
Thanks for all the inspiration. Yours in one of my favorite blogs. 🙂
Jennifer @ Ellison Lane Quitls
Clear as can be. Thanks Faith!
melissa steigerwald
Great tutorial Faith! Looks like something I can actually handle. Thanks!
Melanie
Thank you! I bought that issue so I can make your Starfall quilt!
Samantha
Wait, this is a technique? Sweet! I do this when I make things require a partial seem by bad measuring, just to kind of rig it together. I feel better now.
Thanks for the tutorial, clear and lovely as always!
Vera
Great tut! Thanks for sharing.
Cindy
Love this tut- thanks for sharing! Does it matter how you press the seams- open or to the side? Thanks!
Faith
Either way Cindy, whatever you are most comfortable doing. I pressed mine to the sides for this block.
Vivian
Thanks for giving clear and concise instructions on another technique to add to my toolkit!
Jennifer B
Thank you! I’ve been sewing most of my life, but am just learning to quilt. This was just what I needed, clear, concise instructions.
Rebecca Grace
See, this is perfect. This is the kind of block that LOOKS so scary that it frightens many beginners away, but the way you explain it? It’s suddenly a piece of cake! Thank you! 🙂
Lee
Great tutorial. I learned a lot. You make it look so easy….well I guess it is easy now!! Blessings Lee
Kitty
Love this technique–so easy and I never would have thought of it! Will definitely use it in the future :-))
CAT
Wonderful! and it is so simple! What is with my brain that I cannot see how this was done!???
AND can you please tell me what fabric that is with the ship. I love that.
Thanks!
Cat
Faith
Hi Cat! The fabric is from Out to Sea by Sarah Jane Studios. 🙂
Katie
Can you do paper piecing on copier paper, or do you have to transfer it to a lighter paper? if so what do you suggest? I love the way you do your tutorials, so easy to follow so going to give it a try. Also would like to print off the instructions and pictures, but it also prints off all the comments and takes way to much paper and ink. Thank uou so much for sharing your knowledge. God Bless Katie
Faith
Hi Katie – thanks for your comment! I use regular printer paper (I do waaaaay too much paper piecing to mess with any “special” paper – no time for that! :))
If you want to print the tutorial, just select for your printer to print the first 3 or 4 pages instead of “All”. That should limit the printing of the comments.