
Farmer's Market Totes ~ A Pattern

Farmer's Market Tote: Pattern by Faith Jones of Fresh Lemons Quilts
Today I'm excited to share with you a new tutorial, the Farmer's Market Tote. Andover Fabrics was kind enough to send over some of Marisa of Creative Thursday's upcoming line Locally Grown for these bags. I am absolutely in love with the little sheep and strawberries.

Farmer's Market Tote: Pattern by Faith Jones of Fresh Lemons Quilts
It does feel a bit strange making bags for fresh veggies when it looks like this outside.

Farmer's Market Tote: Pattern by Faith Jones of Fresh Lemons Quilts
But I think that is partially what motivated me - I'm ready for summer! And anyway, it doesn't need to be warm to need a big bag to carry our fabric around in, right? Let's get started!

Farmer's Market Tote: Pattern by Faith Jones of Fresh Lemons Quilts
Farmer's Market Tote
Please note, all seams are 1/2″ unless otherwise noted
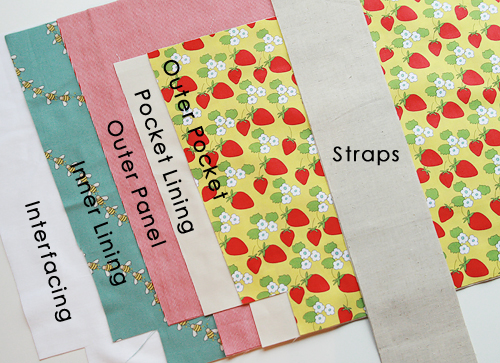
Fabric Requirements Outer Panel - 1/2 yard Outer Pockets - 1/2 yard Pocket Lining - 1/2 yard Inner Lining - 1/2 yard Straps - 1/4 yard (not a fat quarter) Interfacing, (I used Pellon SF101) - 1 yard
Step 1: Cut your fabric.

Farmer's Market Tote: Pattern by Faith Jones of Fresh Lemons Quilts
Outer Panel - Cut (2) 17-1/2" x 20"
Outer Pockets - Cut (2) 14-1/2" x 20"
Pocket Lining - Cut (2) 14-1/2" x 20"
Inner Lining - Cut (2) 17-1/2" x 20"
Straps - Cut (2) 4" x 26"
Interfacing - Cut (2) 17-1/2" x 20"
Step 2. Iron your interfacing to the wrong side of your outer panel fabrics according to the manufacturers directions.
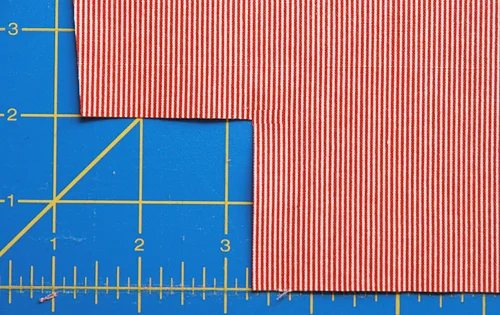
Step 3. Now we are going to do a bit of trimming. Take your 17-1/2" (tall) x 20" (wide) Outer Panel rectangles and trim a diagonal line from the top left corner to the 1-1/2" marking on your cutting mat, as shown.

Farmer's Market Tote: Pattern by Faith Jones of Fresh Lemons Quilts
Step 4. Repeat on the right side of the fabric, cutting from the top right corner to the 18-1/2" marking on your cutting mat.
Step 5. Once your fabric angles are trimmed, cut 2" squares out of the bottom left and right corners. This is for your gusset later. Because there is a slight angle from steps 3 and 4, you won't be removing an exact square. Just be sure to line up your ruler as shown below.

Farmer's Market Tote: Pattern by Faith Jones of Fresh Lemons Quilts
Farmer's Market Tote: Pattern by Faith Jones of Fresh Lemons Quilts
After cutting out the squares, this is what your Outer Panels should look like.

Farmer's Market Tote: Pattern by Faith Jones of Fresh Lemons Quilts
Step 6. Repeat steps 3, 4 and 5 for your Inner Lining.
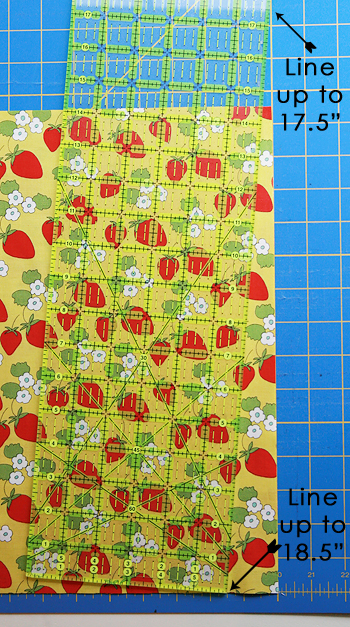
Step 7. Now it's time to trim the Outer Pockets. Just like you did for your Outer Panel, we are going to cut the fabric at an angle on the left and right sides. Line up your ruler from the 17-1/2" marking on your cutting mat, to the 1-1/2" (when cutting left) and 18-1/2" (when cutting right) measurement on the bottom of the cutting mat, as shown. This will get you the same angle you cut on previous pieces.
Alternatively, you could use your previously cut Outer Panel as a template and trim along the already cut lines.
Farmer's Market Tote: Pattern by Faith Jones of Fresh Lemons Quilts
Step 8. Just as you did in Step 5, trim 2" squares from the bottom corners. Your Outer Pockets should look like this.

Farmer's Market Tote: Pattern by Faith Jones of Fresh Lemons Quilts
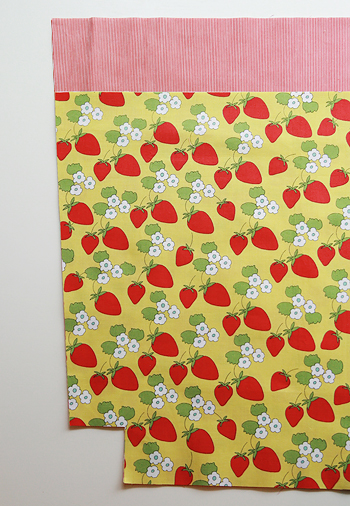
As you can see, the Outer Pocket fabric has the same angles now as the Outer Panel fabric.
Farmer's Market Tote: Pattern by Faith Jones of Fresh Lemons Quilts
Step 9. Repeat for your Pocket Lining.
Everything is now cut - yay! Pat yourself on the back.
Farmer's Market Tote: Pattern by Faith Jones of Fresh Lemons Quilts
Now let's sew it together!
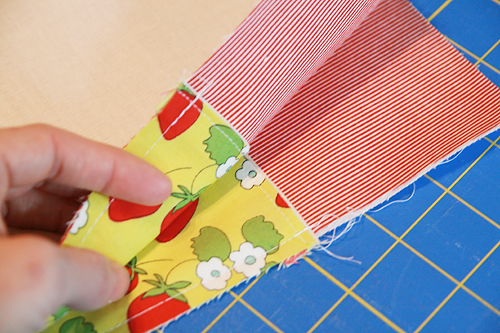
Step 10. Take one of your Outer Pockets and one of your Pocket Linings. Pin along the top, right sides together. Stitch along just the top, using a 1/2" seam allowance.

Farmer's Market Tote: Pattern by Faith Jones of Fresh Lemons Quilts

Farmer's Market Tote: Pattern by Faith Jones of Fresh Lemons Quilts
Step 11. Flip right sides out, and press. Top stitch along the finished seam.

Farmer's Market Tote: Pattern by Faith Jones of Fresh Lemons Quilts
Step 12. Repeat for your second Outer Pocket and Pocking Lining.
Step 13. Place your finished Outer Pocket Panel on top of your Outer Panel, as shown. Pin together along sides and bottom. Machine baste along the sides and bottom of the panel, using a 1/4" seam allowance. ** Do NOT sew the cut out squares! **
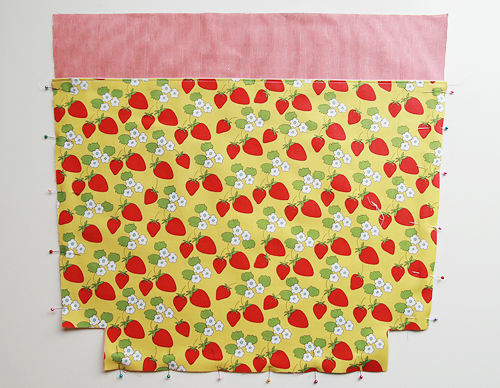
Farmer's Market Tote: Pattern by Faith Jones of Fresh Lemons Quilts
Step 14. Now we are going to split the pocket into two sections. Using your ruler and a marking tool, measure halfway across the panel. Mark a sewing line lengthwise down the panel, as shown.
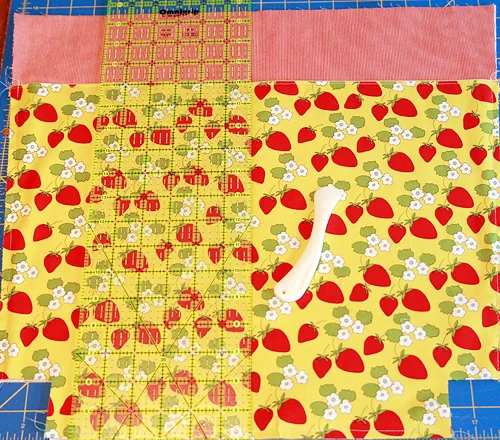
Farmer's Market Tote: Pattern by Faith Jones of Fresh Lemons Quilts
Step 15. Starting at the bottom of the panel and working your way to the top of the pocket, stitch your marked line. Cross over a bit from the top of your pocket onto the Outer Panel and backstitch. This will reinforce your pocket at the top.
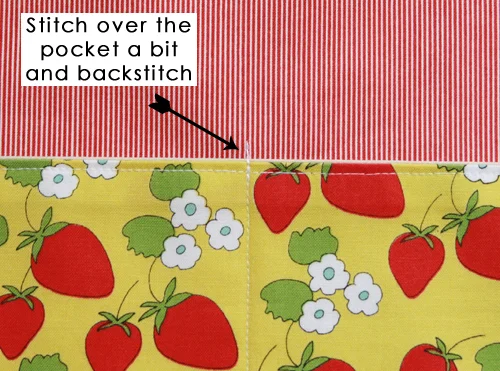
Farmer's Market Tote: Pattern by Faith Jones of Fresh Lemons Quilts
Step 16. Repeat for the second Outer Pocket Panel and Outer Panel.
Step 17. Place your finished Outer Panels right sides together and pin along the sides and bottom. Take care to match up the top of the pockets when pinning. This sort of attention to detail will make your tote bag look professionally made.
Farmer's Market Tote: Pattern by Faith Jones of Fresh Lemons Quilts

Farmer's Market Tote: Pattern by Faith Jones of Fresh Lemons Quilts
Step 18. Sew down the sides and bottom of the fabric, using a 1/2" seam allowance. ** Do NOT sew the cut out squares! ** Press your seams open.

Farmer's Market Tote: Pattern by Faith Jones of Fresh Lemons Quilts
Step 19. Now it's time to sew the gussets! If you have never done this before, this is probably the trickiest step. I took a lot of photos to help explain.
"Open" up your bag in the corner where you cut the squares, and place the fabric back together matching up the side and bottom sewn seam, as shown.

Farmer's Market Tote: Pattern by Faith Jones of Fresh Lemons Quilts
Step 20. Pin as shown.

Farmer's Market Tote: Pattern by Faith Jones of Fresh Lemons Quilts

Farmer's Market Tote: Pattern by Faith Jones of Fresh Lemons Quilts
Step 21. Sew using a 1/2" seam allowance.

Farmer's Market Tote: Pattern by Faith Jones of Fresh Lemons Quilts
Step 22. Repeat on the other side to make the second gusset. This is what your bag should now look like.

Farmer's Market Tote: Pattern by Faith Jones of Fresh Lemons Quilts

Farmer's Market Tote: Pattern by Faith Jones of Fresh Lemons Quilts
Step 23. Attempt to press your seams and flip your bag right side out.

Farmer's Market Tote: Pattern by Faith Jones of Fresh Lemons Quilts

Farmer's Market Tote: Pattern by Faith Jones of Fresh Lemons Quilts
Step 24. Repeat steps 17 - 22 to assemble your Inner Lining. **Leave approximately 5" open along the bottom however, for flipping the bag right side out later.**
Step 25. Place your Outer Tote Section right side out, into the Inner Tote Section wrong side out, as shown.

Farmer's Market Tote: Pattern by Faith Jones of Fresh Lemons Quilts
Step 26. Pin along the top of the bag, and sew together along the entire top, using a 1/2" seam allowance.

Farmer's Market Tote: Pattern by Faith Jones of Fresh Lemons Quilts
Step 27. Flip your bag right side out through the opening in the bottom of the lining.

Farmer's Market Tote: Pattern by Faith Jones of Fresh Lemons Quilts
Step 28. Stitch the bottom of the lining closed.
Step 29. Press your bag and top stitch around the top.

Farmer's Market Tote: Pattern by Faith Jones of Fresh Lemons Quilts
Step 30. Almost there! It's time to make the straps. Fold the short edges of your strap fabric in about 1/4". You can optionally stitch these down, as shown. Now fold your strap fabric in half, lengthwise. Iron to make a crease and then open.

Farmer's Market Tote: Pattern by Faith Jones of Fresh Lemons Quilts
Step 31. Fold your strap fabric in lengthwise towards the center crease line, as shown. Press.

Farmer's Market Tote: Pattern by Faith Jones of Fresh Lemons Quilts
Step 32. Fold in half again. Press.

Farmer's Market Tote: Pattern by Faith Jones of Fresh Lemons Quilts
Step 33. Stitch around each side of the strap. Repeat for the second strap.

Farmer's Market Tote: Pattern by Faith Jones of Fresh Lemons Quilts
Step 34. Measure 3" on each side of the pocket line you stitched earlier. Place your strap ends at this point, 1-1/2" down from the top of the tote bag. Pin in place.

Farmer's Market Tote: Pattern by Faith Jones of Fresh Lemons Quilts
Step 35. Stitch in place, around all sides and then diagonally, as shown.

Farmer's Market Tote: Pattern by Faith Jones of Fresh Lemons Quilts
Step 36. Repeat until all 4 strap ends are attached.
You're done!
Fill up your tote with all sorts of fun stuff!

Farmer's Market Tote: Pattern by Faith Jones of Fresh Lemons Quilts