
Welcome to day 4 of the 12 Gifts of Christmas Blog Hop!

I hope everyone is having fun and getting some great ideas for holiday gifts this year. Today I am going to teach you how to make an iPad case. This tutorial can also be used to make a Kindle case (or Nook or any other tablet device), you will just need to measure your device and add about 1-1/4″ to the width and length to figure out your cut fabric sizes.
For example, the iPad I used for this tutorial was 7.5″ x 9.5″. And my cut fabric pieces below are 8.75″ x 10.75″. So yep Kindle users, you will need to break out the calculator!
Another note, I have an iPad 1 which is a bit thicker than an iPad 2. So iPad 2 users, you may want to cut your pieces 1/4″ (total) smaller to account for your sleeker design. 🙂
Let’s get started.
iPad Case Tutorial
Supplies

9″ zipper
2″ of Velcro
Fabric (see amounts below)
Batting or Interfacing, depending on how poofy you want it (see amounts below)
Cut the following pieces:
| Outer Case Fabric | Back – 8.75″ x 10.75″ |
| Front Top Portion – 3.75″ x 8.75″ | |
| Front Bottom Portion – 7.25″ x 8.75″ |
| Pocket Lining Fabric | Cut 1 – 3.75″ x 8.75″ |
| Cut 1 – 7.25″ x 8.75″ | |
| Cut 1 – 8.75″ x 10.75″ |
| Inner Lining Fabric | Cut 2 – 8.75″ x 10.75″ |
| Strap Fabric | Cut 2 – 3.5″ x 3.5″ |
| Zipper Ends Fabric | Cut 2 – 1.5″ x 2.5″ |
| Batting or Interfacing | Cut 2 – 8.75″ x 10.75″ |
| Cut 1 – 3.5″ x 3.5″ |
(Adding a note: Lots of people are curious as to what the fabric is that I used for the cover. It is Ruby Star Rising Transistor Radios and I bought it from Alice at Fresh Modern Fabric.)

Assembly
1. Let’s start with the strap. Place your 2 pieces of 3.5″ x 3.5″ fabrics right sides together. Place the batting or interfacing on the bottom of the fabric sandwich (see photo). Stitch together around 3 of the 4 sides.

Flip right side out and press.

2. Trim your zipper to 8.75″.
3. Let’s make your zipper ends. I learned this technique from the talented Anna of Noodlehead. Not to sound too much like Oprah, but learning to do these zipper ends was a life changing moment for me…well, as far as nice looking zippers are concerned! 🙂
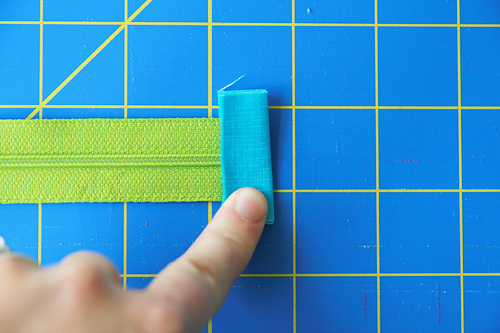
Take your zipper ends and press the sides towards the center as shown in the photo below.

4. Place the zipper ends on the each end of the zipper like this:


Top stitch the zipper ends to both ends of the zipper. This give it a nice finished look.

5. Now let’s assemble the front outer portion of the case. Take your 3.75″ x 8.75″ piece of outer fabric and your 3.75″ x 8.75″ piece of pocket lining fabric. Place them right sides together and place the zipper in the middle of the fabric sandwich. See photo.

Pin in place.
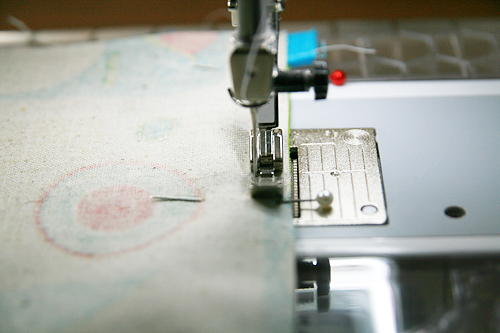
6. Using your zipper foot, stitch down the fabric-zipper-fabric sandwich.


7. Open your sandwich and press.

8. Take your 7.25″ x 8.75″ piece of out fabric and your 7.25″ x 8.75″ piece of pocket lining fabric. We are going to repeat the previous step, but on the other side of the zipper. Place the fabric right sides together and place the zipper in the middle of the fabric sandwich. See photo.

Pin in place.
9. Using your zipper foot, stitch down the fabric-zipper-fabric sandwich.
10. Open your sandwich and press.
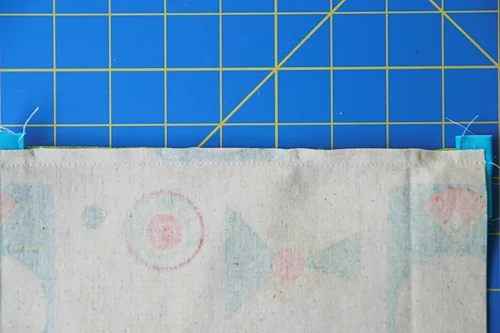
Front:

Back:

Top stitch down both sides of the zipper for a nice, finished look.

11. If you are like me, things may be *slightly* crooked now. Take this opportunity to trim your zipper front piece now to 8.75″ x 10.75″. Set this piece aside.
12. Let’s make the outer back of the case. Take the strap you assembled in Step 1. Take the 8.75″ x 10.75″ outer back piece of fabric. Center the strap on the top as shown in the photo below (Unfinished ends together) with a slight bit of overhang.

13. Baste into place with less than a 1/4″ seam allowance.
14. Let’s finish the assembly of the outer portion of the case. Make a fabric sandwich as follows:
8.75″ x 10.75″ outer back right side up – 8.75″ x 10.75″ assembled zipper front right side down – 8.75″ x 10.75″ pocket lining piece right side down

15. Stitch around sides and bottom, leaving the top open. Flip right side out and press.


16. Now let’s assemble the inner lining. Place the 8.75″ x 10.75″ inner lining pieces right sides together. Place an 8.75″ x 10.75″ piece of batting or interfacing on the top and bottom of the fabric sandwich.

Stitch around sides and bottom, leaving the top open. Do not flip right side out.
17. Time to put it together! With the exterior of the case right side out and the lining of the case wrong side out, place the exterior inside the lining and pin the tops together. Make sure the strap is tucked in.

18. Stitch around the top of the case, leaving about 4″ open to flip the case right side out.
19. Flip the case right side out and tuck the inner lining into the outer shell. Press. Top stitch around the top to close the opening and give the case a nice, finished look.

20. Add velcro to the back of the strap and the case. Stitch in place.


Now for the giveaway!
Enter to win a $25 gift certificate to Fat Quarter Shop by leaving one comment on this post. I will choose one winner via Random.org on Oct. 26th.

Also, please visit Ellison Lane Quilts and leave one comment on her tutorial to be entered to win the GRAND PRIZE of a $250 gift certificate to Fabricworm!
And just for stopping by, you can take advantage of a generous 15% off discount at Fabricworm with the coupon code fw12days through the end of the blog hop.
Don’t forget to keep checking out the tutorials over the next week and a half!
Saturday, October 15- Ayumi/Pink Penguin
Sunday, October 16- Amy/ Lots of Pink Here
Monday, October 17- Faith/Fresh Lemons Quilts
Tuesday, October 18- Penny/Sew Take a Hike
Wednesday, October 19- Kati/From the Blue Chair
Thursday, October 20- Lee/Freshly Pieced
Friday, October 21- Elizabeth/Don’t Call Me Betsy
Saturday, October 22- Melanie/Texas Freckles
Sunday, October 23- Lindsay/Craft Buds
Monday, October 24- Amanda/A Crafty Fox
Tuesday, October 25-Vanessa/Little Big Girl Studio
******** UPDATE ********
I’m closing comments and picking a winner for the Fat Quarter Shop gift certificate! If you have any questions or comments in the future on this tutorial, feel free to email me. My email address is at the top of this page by my photo. Thanks everyone, be right back with the winner!
************************
The lucky winner is Mary on Lake Pulaski. Mary said “Great tutorial! I’ll be making one tomorrow! Thank you.”
Congratulations Mary! I will send your email address off to Jennifer who is coordinating the prizes!


Fiona says
I love how you add the bits to the ends of the zips…. makes it very neat… thanks…
Hugz
A says
If I make one of these and leave under the Christmas tree – do you think the elves will fill it with an ipad??
Heather says
This pattern looks amazing. Love the zipper. Too bad I don’t have an iPad!!
Merran says
Great tute, that zipper trick’s a winner! might actually go make one now.
Sheila says
This is great! My sister was given an iPad for her birthday this past summer, so this would make a great Christmas gift for her. Are your measurements for the current iPad version, or do I need to get her husband to take stealthy measurements for me?
Anne says
The colours you have used in this are gorgeous.
poppyinipink says
I thought the same thing as Fiona, in fact your tutorial has been a breakthrough for me in putting zips into bags per se …I want to send you a big hug!!! thanks so much and hope your day blossoms into a beautiful flower too.
Jenelle says
I really like that zipper trick too. It works incredibly well on metal zippers too (which can be tricky to sew nicely otherwise). Thanks for the tutorial!
Susan says
Great tutorial, thanks. Loving this blog hop.
debra says
I needed this tutorial, as very soon t o be the owner of her very own ipad…thank you
CJ says
If I had a iPad, I’d definitely make this! Thanks for the great tutorial! Your explanation is so easy to understand. Again, thanks!
Melissa says
Those zipper ends sure look great, I’m definitely going to give that a try. Thanks for the tutorial, this one is PERFECT for gifting!
Meghan says
Will this work for the iPad2 as well? I’m assuming I’d use less since they are thinner?
Faith says
Yes! I would make it a bit smaller since it’s thinner, probably subtract somewhere between 1/4″ to 1/2″ from the overall size of the cut pieces.
Jackie says
A fantastic idea for the grandkids this year, Will personalize for each on the 9 grandkids.
Marilee says
I am responding on my iPad that needs a case. Thanks.
Sue Bone says
I think I need to make one for me first. 🙂 Love the fabric you used. Who is it by?
Faith says
Hi Sue! The fabric is Ruby Star Rising, Transistor Radios. I bought it from Alice at Fresh Modern Fabric:
http://www.etsy.com/listing/76119760/fat-quarter-transistor-radios-in-blue?ga_search_query=radio&ga_search_type=user_shop_ttt_id_6211819
Teje says
Hi! That case is beautiful! Thank you for a great tutorial! Zipper is always tricky so every advice is welcome!
Joanne H. says
I love the fabric here, especially the polk dots! I don’t even have an iPad, but this tutorial makes me want to make a case anyway. I’m sure I know someone who could use it. 🙂 Thanks for the tutorial and giveaway!
Anne says
Ooooh I’ve been wondering how people do that cool tab thing over the zipper for a while, and there it is, in such a cute tutorial too! I might need to go get an ipad so I can make this case. That’s how it works, right? 😀
Vreni says
Great tutorial! I especially like the part with the zipper! That’s always something I struggle with. But you’ve showed and explained it very well! Thanks very much!
Mystica says
Thank you for the tutorial and for the giveaway!
Andrea says
Great tutorial, I’m sure I’ll make one! And thanks for the giveaway, too!
Vanesa says
Thanks for the tutorial! I love your choice of vintage radio fabric for this gift too!
Heike says
Thank you for this great tutorial. It is wonderful.
And thank you for the giveaway, too.
simone says
What a great tutorial. The four members of this family all have an iPad, so I think i’d bettter get started.
Wonderful, all the pictures you took, to make this tutorial so clear!
Happy week (o:
Martina says
Thanks for the great tutorial! This is fun!
Pat V. says
Thanks so much for sharing this tute. I really want to make my MIL an ipad cover for a Christmas gift. I will have to overcome my fear of zippers, tho…
Suz says
I think I will make one of these- then I’ll HAVE to buy an iPad!!! Fab!
Gill says
Great tutorial! A kindle is on my Christmas list so I’m going to make a pouch in anticipation! Fingers crossed!
diane stanley says
I just got an ipad for my husband for his birthday, so I will need to make one of these very soon.
Jill B says
Yay! I’ve been meaning to make an iPad cover for ages and haven’t sorted it out yet. Thanks for doing the hard work! I like your fabric choice – I”ve had the viewmaster print set aside for this very project :). I love the irony of using this fabric for such a modern device.
Glenys says
I haven’t an iPad. 🙁
Eli says
Oh, I love it. I just received a Kindle for my birthday so guess what I’m sewing next? Thank you!
Fran says
I love this tutorial, thanks so much. Great detailed instructions & the photos are really helpful as well. I’ve been wanting to make an iPad cover for a while & I even have some of the same spotty fabric that you used as the lining!
charlotte says
very nice tutorial. you make zippers look easy. thanks.
Michelle Olsen says
Great tutorial, and I love your fabric choice for the iPad case. You make zippers look so easy! Thank you for the giveaway 🙂
Debbie says
Love the tutorial. The zipper looks so great and professional. Thank You
Gabriella says
Wonderful totorial ^__^
Thanks so much
Sue says
Great tutorial, thanks! I’m going to use it to make a present for myself!
QuiltSue says
I love the fabrics you used for your case.
ayumills says
Such a great tutorial, Faith! I love it! I want to get an iPad just so I can make this for myself!
Heather says
I’ve see quite a few tutorials for iPad covers, but like the addition of the zippered pocket in this one! Thanks!
Donna says
Great tutorial. I know someone who is getting once of these cases for Christmas. Thanks.
Joyce Mitchell says
Great tutorial. Thanks for the giveaway.
quilary says
Thanks for the pattern – now all I need is to convince the MaTH (man about the house!) that I need an iPad to go with my new cover 🙂
Misty says
Wow, thank you for the excellent tutorial! I’ve been meaning to make myself an iPad case for a while now and this looks like the perfect pattern!
Vickie says
This is a great tutorial! Thanks for sharing! This would make a great gift!
Lisa Marie says
What a great tutorial! I’ll add this to my list of things to make before Christmas. Thanks for the inspiration.
Becky M says
Great tutorial. Sadly, I don’t know anyone with an IPad! I guess I’m surrounded by too many housewives! hee hee! Maybe Santa will bring one for me. 🙂
Leslie says
Thank you for the tut, your pictures really help! This is definitely on my “to make” list. Thanks for sharing!
Joanna says
I agree that your tutorial is super. The case looks so neat. Thanks.
WandaFish says
I love this tutorial, even though I don’t have an ipad – I’m sure I’ll be able to find someone who needs a case for Christmas! Thank you 🙂
Maggie barber says
Great tutorial, thanks!
Karen says
Love this tut and great to use with nook or kindle too!
Nancy says
Cute case & like your fabric choices!
LInda at Roscoe's Ma says
This is such a detailed tutorial. I actually think I could make this. And it is so cute! Thanks!
Marika says
I wish I had an IPad so I could make this cute case !
MaryBeth says
Cute bag. Thanks for the tute!
Karen M says
What a great tutorial. Thanks so much.
Cara says
Cute case! We just got an iPad…i’m seeing a case in our future!
Elena @ Breakfast for Dinner says
Love it! I love the print and the zipper detail is a great idea!
Wendy says
Great tutorial and thanks for the giveaway!
Lilly says
Thanks for the tutorial. I really like this case and the fabrics that you use to make it.
Rhonda aka Quilter in The Gap says
This is going to come in handy since my daughter wants an iPad for Christmas. I thinking I will wrap it while in its new case! What fun. Thanks for sharing.
Jenna Maine says
Great tute! Thanks!
Tiffany says
This is a great gift idea! Thanks for the tutorial.
Melinda says
I’ve seen some of these but I like your addition of those type of zippers where it has the finished edges.
Jackie says
Great tutorial! I think I could easily adapt this for my laptop and my husband has an ipad. Love the zippered pouch. The fabric on each end give it a nicely finished look.
Suzie says
What a great i-pad case. Could this be the one to overcome my fear of zippers.
Cori says
Thanks this is great!
Lindsey F. says
Great tutorial and I love the zippered pocket. I will definitely be making a few of these as Christmas gifts.
Catherine says
Great tutorial, especially the zipper instructions. Hope I can use it sometime soon!
Silke Scheller says
Hey Faith,
thank you for this fantastic tutorial!
Greetings from Silke from Germany
Jennifer @ Ellison Lane Quitls says
Such a great tutorial Faith. You explained that zipper so well- I think I could manage those covered ends now! 🙂 Thanks so much for being part of the blog hop!
Dana says
That is just too cute, thank you so much. I can’t wait to try it.
Naomi Vela says
Maybe if I make the cover, the Ipad might come! Great tute, thank you. Hugs Naomi
Heidi says
Thank you for this wonderful tutorial and the change to win 🙂
Lucy @ CharmAboutYou says
Loving that fabric! I’m in the no ipad bunch but I’d make this if I had one!
suvi says
How cool is that! My sister is definitely getting a kindle pouch for christmas!
suvi says
OK, so I made it already…with the zipper vertical rather than horizontal, since kindle is smaller. Believe it or not, I managed to sew in the zipper upside down, not once but four times in a row! Finally I just left it that way. Just in case anyone would like to know, the front and back measures I used were 9″x6½”, good for a kindle without a cover but if yours has a cover you’ll need to add 1″ to the width. Also I made the strap ½” narrower and almost 1″ shorter.
Stray Stitches says
Thanks for the wonderful tutorial! These would make great Christmas gifts. Thank you, also for the opportunity to enter your great giveaway.
Cheryl S. says
Well I don’t own one of these myself, but I know some that do. What a great idea for Christmas. Thank you!
Andrea C says
so cute!! love the zippered part!
Emma B. says
Great tutorial! This will be perfect for my mother-in-law! Thanks!
Liz says
Great tutorial! I’ll be pinning this for sure! Thanks for the giveaway!
Jana K says
Very cute! Thanks for the great tutorial.
SR says
Love the fabric choices, the way the zipper is finished and the extra pocket. Definitely on my list of to-dos. Thanks for sharing!
Jess says
Great tutorial! Thanks. I was looking for an ipad case tutorial to make for my Dad. Thanks!
Liane R says
That case is CUTE! Definitely need to try as a gift for my daughter! Thanks!
Teresa says
Thanks a lot. I bought an Ipad recently and that tutorial couldn’t have arrived in a better occasion.
Ellen Ban says
Great tutorial! Now all I need is an Ipad… Thanks for sharing the zipper ends tip.
Lori C. says
What a great tutorial. Really clear instructions. Just a thought….if you sew the velcro to the bottom of the tab before assembly you won’t see the stitches on the front. Maybe top stich around the edge of the tab to hold top and bottom together.
Sharrieboberry says
Hmmmm, I DO have a kindle. But do I have the m-skills to tackle the changes. Yea, probably. Thanks for the lovely pics. It definitely helps!
Kathy says
Thanks so much. I’m making a cover for my kindle!
Blossom says
Cute! Wish I owned an Ipad, so I could make this!
Karen says
Love the iPod case. Thanks!
Michelle says
This is fantastic, I love it!
Love the outer zippered pocket!
Lisa Mather says
What a great tutorial. I currently don’t have one, but maybe one day…
Connie says
What a wonderful Ipad case! What neat fabric and a great tutorial!
Tamie says
Great tutorial. Thanks for participating in the blog hop.
Andra says
This is a great tutorial, I will have to make one for my brother I think, he is very hard to buy for.
Tiffany says
I’ve been needing to make one of these! Thanks for the tute!
Sew Create It - Jane says
Fantastic tutorial and clever construction. Thanks for sharing :o)
Marlene Carpes says
Eu adorei este pap, como ficou fácil costurar o ziper
Thanks
Marlene from Brasil
Karen says
Love this tut!! I need to make several of these this year and you have now made it much easier. Thanks!!
Flaun says
Love the zipper pocket on the front! I need to make a case for my new laptop and was trying to think of a way to put cord storage on it. This will do nicely (maybe with an added gusset for the wider transformer).
duff says
you know, Faith, this case is so darn cute because your ability to choose coordinating fabric colors is one of your strongpoints! Great tutorial!!
Nancy D. says
I love that your case has a pocket. Thanks for sharing!
charlotte @ twelfthzodiac says
Great tutorial….now, if I could just find someone to buy me an ipad! Or Kindle! 😛
Jen says
Awesome tutorial, thanks for the giveaway!!
Dawn P says
Great Tutorial!! And I love the fabrics you chose! Thanks 🙂
Kelsey says
So cute!! Now I just need to get an iPad to put in one 🙂
Deb says
Awesome tutorial – thanks! I will be making one of these for myself for Xmas.
Sandy N. says
Makes me wish I had an ipad to put in it. LOL! Thanks for the opportunity to win!
viviana says
hi!!
great tutorial, the pictures are clear
my niece asked me to make her an ipod pouch, will show her yours, and see if she likes it!! finger crossed
thanks for the giveaway chance
Joelle Lambert says
Great tutorial. i will adapt it o my kindle. THhanks so much.
kathy h says
Very cute ipad cover. I like how to finish the zipper ends and never saw directions for them. Thanks for sharing this tutorial. Seems much easier to me now than I thought.
Darlene Staley says
Love this ipad cover and thanks for sharing how to create it for this and for other devices. I like how you left the zipper visible. Makes everything else pop!
Annmarie says
Great tutorial – thanks. Will make a great Christmas gift. And thanks for the chance to win the GC…..
Angie says
Very cute Ipad case, thanks for the giveaway!!
Mary Jo says
Thanks for a great tutorial. Like the fabrics you used.
jmniffer says
Great gift idea for friends with I-pads…just need to get over my zipper phobia! Thanks for th.e tutorial and for the chance at your giveaway
Angela says
You have a lovely blog! Thanks for the freebie and the chance to win!
Dawn W says
Great tutorial and fabulous fabric! (… now if only I had the ipad to put in it …) Love your blog!
Mel says
Love your tutorials! Thanks for the giveaway!
Lisa says
such a cute cover!
Anita says
This was a great tutorial. The photos and instructions were clear and helpful. Thank you! =)
Kelly O. says
terrific tutorial! thanks soooo much!
elizabeth says
Thanks for the tutorial, I need to make one for my sister : )
Allison C says
Great tut! I will bookmark and definitely make soon!
Emily says
Great tutorial. Thanks!
Patti says
I love your fabric for this and the tutorial is fantastic. Now, I just need to win an ipad! Thanks for the opportunity to win the giveaway.
CaroleM says
Thank you! I really love this tutorial and think it would be neat to maybe make one for my husband for Christmas. I wonder if I could get my hands on some Chicago Bears fabric…
Lorri says
Great tut!!! Thanks for the giveaway.
Kori Ireland says
Ooh, filing this away since an ipad is on my dream list. 🙂 Love the tut, thanks!
Violeta says
Wow! Great pictures!! Makes me want to do more non-quilty sewing! :o)
dawn says
A great tutorial that will just have to wait. An ipad is on my Christmas wish list. Thanks!
Holly says
Cute, cute, cute!
Kate says
Love the zipper trick! Now is just need some gadget to measure and create for. Great tutorial. Thanks!
Dina P says
I love that polka dot lining! I think I would just peak inside that zipper for fun! Awesome tutorial.
Jennifer says
I love this idea. My kids constantly throw their ipod in their purse which has led to numerous scratches on the screen. Maybe a cute pouch is just what they need (in their stocking on Christmas morning).
xandi says
I love how you used fabric with old school technology on modern technology.
Sigrun says
Now I just need an i-Pad 😉 Thanks for the tutorial!
EmilyW says
Wonderful tutorial – thanks!
anna says
awesome faith! my mom is buying an ipad, perfect timing!!!
Hallie says
How cool! You make it look so easy! I love the fabric too.
Thanks for such a great project. Love your blog.
sukie says
Great tutorial! Love your fabric choices too.
Lindsay F says
Great tutorial. You make it look so do-able.
Núria says
thanks for your tuto! So cute!. Love your blog.
Happy week.
Núria
I’m follower
Meghan says
I love this fabric.
Linda says
NEAT TUTORIAL!
THANKS FOR SHARING!
HAPPY STITCHING!
Sharon P says
Thanks for the great tutorial! 😀
jennifer says
Great tutorial! Thanks!
Lee says
That is so cute! I LOVE that you used the transistor radio fabric for an ipad case. How perfect is that? : )
Pat says
Thanks for the tutorial and giveaway!
Kara says
I love that! Looks great!
bee says
wonderful! i’ve been looking for an easy to follow tutorial on making these cases! can’t wait to give it a shot.
rosa says
Cute tutorial and lovely fabrics.!!Thanks for the zipper thick!!
Renae says
Very cute.
Thanks for the tutorial
Eden says
Very practical gift… I might make one for myself!
RobinLovesQuilting says
Ooh! I don’t have a iPad but if that works for a kindle, I am totally on it! The Zipper pocket is an adorable and thoughtful detail, I must say.
Molly says
Great tutorial! Such a perfect holiday gift idea. And I love the fabric you used.
Jackie says
These will make great gifts for all my friends. Great tute
Jackie says
I’ll be making these for Christmas for friends and family. It will be fun matching fabrics to personalities.
Trish says
so far I want to make every single one of the tutorial/gifts! Where am I gonna get the time???
patricia says
Lovely tutorial, thanks for the giveaway and tute!
sarah says
Nice tutorial! Thanks for the giveaway.
Rineke Nanlohij-Sturm says
Thank you for thisgreat tutorial. I think I will make a present for myself…
Lisa Estrada says
I wish I had an iPad to make this case! I might just have to adapt the size and make something else.
Darcy Childress says
Looks like a great gift idea – thanks so much!
Jane S. says
Thanks for the tutorial! I don’t have an iPad, but I do use a netbook so I’ll adapt the pattern to fit that.
Abby says
thank you for the tutorial – I’m considering a kindle or nook for the boyfriend for Christmas, and this will be a great starting point to make him a case to go with it!
Corey Milligan says
How cute is that iPad case?! Too bad I don’t have an iPad or else I’d make tons of cases for it 🙂
Thanks for the awesome giveaway!
Rachel at Stitched in Color says
Thanks for the very clear photos on the zipper tabs. I need to give those a whirl.
Molly says
This is a great tutorial! Thank you for sharing!
Elizabeth says
These will make great gifts for my family members! That zipper trick makes it look super nice!
Vale says
Wow!! I love this, and great timing. We are gigging a Kindle this year for Christmas- I need to make one up this next weekend! Thank you!
Rebecca says
Great tute! Now I just have to get an iPad 🙂
ourbusylittlebunch(at)hotmail(dot)com
Grace says
What a fun tutorial! You make it look so simple 🙂 Thanks for the chance to enter the giveaway!!!
Linda in PA says
I don’t own an iPad yet, but am hoping to get one soon. I will definitely make one of these cases when I do. Thanks for the tutorial.
Dawn says
What a great tutorial, my IPAD is in need of a new cover. This will be a project for this weekend.
Sonia B says
Awesome tutorial! Thanks!
Marci Girl says
Beautiful tutorial, I just need to get that Kindle Fire and I can make a case for it!
Kelly says
Wonderful tutorial. Hubs will be getting an Ipad soon…gotta make him one.
Sherry says
Your idea for an i-pad cover is great. I have people on my list with i-pads and kindles. Thanks for the great tutorial.
Annie says
This will be a nice change from my crocheted Kindle cover and a great Christmas gift for my brother-in-law for his Ipad. Thanks!
Lisa says
Thanks for a great detailed tute. This case would work very well to put a good old fashioned hardcover or paperback book in to carry along as well.
Cindi C says
Love the tutorial! It would make the perfect gift for someone I know. Don’t you love doing zippers that way? I learned that method from another source. It make doing them so easy! Thanks for sharing.
Lynn says
What a great project. Thanks for sharing.
Barb in MI says
The I-pad case loosk great! Thanks for the tut – and giveaway!
Lynn Brown says
Cute iPad case! Thanks for the tutorial!
Kelsey says
Thanks for the tutorial! Will keep it in mind when my Kindle Fire gets here. 🙂
Christy says
Love how you did the zipper. I wish I had an iPad to put in this case!
Melissa Corry says
Now I just need to get me an ipad 🙂
KZK says
GREAT tutorial! Thanks – these will make wonderful Christmas gifts!!!
KZK
Ella says
THanks for the chance to win! (and the ideas for more Xmas presents)
Julianna says
Yay! This is such a cute tutorial.
Kelly Irene says
I love the zipper pocket on this! Thanks for the tutorial!
sarah says
these are adorable – it seems like everyone on my list has an ipod; i know what they will be getting! 🙂
lynn says
thanks for the great tutorial and giveaway chance!
DianeY says
Your case is beautiful. I’m definitely going to make one of theses
MollyP says
Very clean looking. Great tutorial. Thanks, lady!
Carmen says
Great tutorial! I have a Nook that needs some dressing up…
Beth says
I love this case. My girlfriend just received an ipad for her birthday so I will need to make one for her and then maybe make one for me in case I get one from Santa!
Tina says
This is great! Thank you! 🙂
Beth says
I have been looking for a good Kindle case tutorial. THanks so much! Also thanks for the y seams tutorial. I have always been too scared to try them.
Carolyn says
I LOVE this tutorial! What a wonderful gift for those that have the iPad. Thank you for sharing your talent with us. I will definitely be adding this tutorial to my “every growing to do list”. 🙂
Denise says
This tutorial will come in handy for gift giving. Thanks for sharing with us.
Heather says
Thanks for the sweeet tutorial! I’m putting this on my pre-Christmas list of things to make even though it looks a little challenging for me (a new sewer/quilter). I’ve never tried a zipper (EEK!) but this might be just the tutorial to push me in that direction.
bess says
what a great tutorial! adding to my christmas “to do” list….
Katy says
Ooh, love this with the zippered front pocket
VickiT says
Excellent tutorial. Thank you very much. I’ve seen others but your tutorial has such great instruction.
Rita Goshorn says
great tute! i may not have an ipad, but this pattern can be used for other similar things. thanx for the idea and the opportunity to win a gifty!
K SCOTT says
Thanks for the great tutorial!… and the giveaway.
chelsea says
I love your ipad case, and that Melody Miller print is the perfect choice. I think the hubs may need one of these for christmas!
KellyS says
Thank you so much for the cute tutorial! I have an iPad on my Christmas list! 🙂
Cindy says
thanks for this Great tutorial!!! Both of my sons have ipads and so this will be the perfect gift!!! love it!
Carrie P. says
Great job. I like the way to did the zipper. Makes it look not so scary.
Jansie says
What an awesome tutorial. Really great job with all the pics and clear instructions. Thanks so much!
Marsha B says
That is a great case! Thanks for the tutorial.
Lindsay says
Thanks for the great tutorial. I absolutely love your fabric choices too!
Jenny Matlock says
Oh wow. I need this! I have a laptop that’s jsut slightly bigger than this and I haven’t found a cute laptop cover for it yet!
I am soooo going to attempt this.
Thank you!
And thanks for the fun giveaway, too!
Alli says
Oooh, your ipad case is super cute. It’s too bad I don’t have one! :} Thanks for the chance to win!
Marieke says
I love this, it’s very pretty. Thanks for the tutorial!
Julia C says
I don’t own an ipad yet but just seeing that gorgeous ipad cover, I think I need to get one just to have something to put inside. I especially like the zipper!
Jeannette says
Ah ha! I was just wondering how I should do the zipper ends thing. Thanks!
Billie K says
I would use the GC toward American Banner Rose fabric.
Rachel D @ Just Sew Y'all Know says
Love the tutorial – now I just need to get an iPad so I can use this case!
Karen W says
Ohhh I love this. I just got an ipad at work and mine looks like everyone elses. Now I can be different
Jessica Pierre'auguste says
I really like this iPad case. I think I will make one for my grandmother for Christmas. Thanks for sharing!
CarolC says
What a great tutorial! I know just the person to make this for. No it’s not me. I really liked your fabric choices too. The Blog hop is wonderful. Can’t wait to see what else everyone comes up with. Thanks for the chance at the giveaway.
Doris says
I really like this, especially in the colors and fabric you used!
Sallie says
I love the fabrics you selected. Thanks for the tutorial and giveaway!
Katy (LethargicLass) says
thanks for the fab tute!
Andrea says
Oh I love this. The fabrics you choose are so fun and bright. I just received an iPad as a gift so I want to make one of these for myself. Maybe I’ll make one for me and one to give as a gift since this is the Christmas season. lol Thanks for the great tutorial and the giveaway.
Julie says
Love the zipper ends trick! Thanks.
Becky T says
oh I so can’t wait to try this for my kindle
Kathy says
Very nice and detailed tutorial. This should be a very popular Christmas gift this year.
Beth says
Great tutorial. Very detailed and love the pictures. I am a visual learner. Thanks so much!
MarciaW says
I like the fabric that you used for the ipad case. Thanks for the tutorial and the giveaway. Perhaps a few charm packs from FQS will be in my near future – just in time for my b’day.
Flying Blind says
I’ll be back the second I win an iPad!! x
Pam says
Very nice tutorial. I don’t have an I-pad or anything like that, but I do use an MP3 player, and if I miniaturized this, it would work great for that! Thanks
Patrick says
Thanks for the tutorial. Maybe Ill have to get an iPad just to try it out 🙂
Mimi says
Awesome tutorial!! I don’t have an iPad yet… but will save your instructions because it is something that I’m putting on my wish list. Thanks for the chance!
Newbie Quilter says
Fantastic tutorial, easy to follow instructions and photos! Thanks for sharing.
Judy says
Sew cute! My daughter is getting an iPad for Christmas, so this will be great to go along with it!
Sheila says
Great tute, will be Pinning this for later. Thank you.
Katharine says
Great tutorial.
Do you think if I make one for myself, Santa will provide the iPad?
Kris says
Very cute tute! Love the presentation for the cutting directions.
Paula says
Thanks for the great tutorial and the giveaway!
ap_lemos at yahoo dot com
Dorothy says
I will be making this “gift” for me 😉
Four dogs and one quilter says
Thank you for a great tutorial. My iPad case is looking a little ratty, can’t wait to make a new one.
Christina says
Adorable! Since I don’t know anyone else with an iPad, I’ll just have to make one for myself!
martha says
I can not wait to try this:) Thank you so much for the tutorial:) And so glad I found your blog:)
Dorothy Bare says
I may have to make this “gift” for myself. Thank you for sharing.
Janelle says
love this tutorial! this will make a great gift. thanks!
Lee says
Thanks for a great tutorial – I needed a pattern for an ipod case for my nephews and one of my sisters! thanks!
Cori says
I love the ipod cover, Thank so much and thanks for the chance to win
DebrafromMD says
This will go on my to-make list for Christmas. Almost everyone in the family has an I pad and it will be fun to choose just the right fabric for each recipient.
JudyCinNC says
I sure did like your tutorial – I do not own an IPad but grand children do so I could make them for the girls. Thank for a wonderful giveaway. Judy C
Sandy parsons says
Thanks for a great tutorial, and a lovely gift idea for Xmas. Sandy. 🙂
ellen says
Great tutorial; great gift idea.
Vickie says
C.U.T.E. Seriously. Looks to be a great tute and I love the fabric choices. Thanks!
Jayne says
Thanks for the tutorial!!!
Ceil says
This is will make a perfect gift! Thank you for the clear instructions. I think Santa will get a hint to give me an ipad so I can make one for myself… maybe I’ll make two and just see what happens!
Robin says
So cute! And just in time for Christmas!
Myra says
Now I REALLY wish I had an I-Pad so I could make it some cute clothes. :o) Thank you for sharing your talents and for the great giveaway.
Linda V says
GREAT tutorial. I liked the comment on if I make one and leave it under my Christmas tree, that maybe I’ll get an Ipad? Just maybe! LOL! Thanks for the contest!
Angel says
Thanks for the tutorial and contest. Love the Ipad holder.
Maeve says
The iPad tutorial is super nice! Thanks for sharing with all of us!
Amy C says
Thank you, thank you, thank you for posting this tutorial. I’ve been looking for a good pattern to make an ipod and kindle cover!
Stitchin' Time says
Great tutorial and with all the kids(adult ones too) having i-pods, gameboys etc a cover is definitely needed to protect the item.
Cheers,
Robyn
Jaclyn B says
Love this idea, thank you!
patricia says
Just another reason for me to have iPad envy. I love this tutorial.
Willa says
I like this ipad case. I have made several……..changed my thinking a bit after getting an ipad! The extra pockets are nice for charger etc.
Tutorial nicely done.
Thanks,
rebecca says
Very cool tutorial!! Great job!!
Melanie says
I love the zipper on the front, good idea! Cute fabric too 🙂 Thanks!
Rachel says
Finally, a zipper tutorial! Yay!
Rebecca says
I love the fabric you chose! I would make one of these for my husband, but no way would he use it!!
Dell says
Great tutorial. Definitely making one.
Donna says
So glad I have the ipad to put into it. Can’t wait to make this adorable carrier.
Patty D says
Great tutorial!
Darci says
The zipper is genius! After adding one to my Weekender I am all about adding them to everything they really come in handy.
Marcia says
Oh so cute. I need to make several of these.
happy zombie says
So stinkin’ cute, Faith! I love your tutorial, and your photos – you make it all click and be doable – specially since if have serious zipper issues. You wow me with everything you do!
Tara S says
This is such a great idea! I am going to have to make a few of these for Christmas… and birthdays!!! Thanks for the awesome tutorial!
Brenda Howard says
Hi, I love the tute, I will be making one for my kindle. I love the idea of putting the ends on the zipper. NEAT!
Kathi says
I love this especially the zipper ends idea. I’ve never seen that.
Dawn says
Thanks or the great tutorial for the iPad case! I think your post finally inspired me to make a cover for myself and then one for a friend. Left a message as requested on Ellison Lane Quilts for the giveaway. Enjoying all the tuts! The 12 days of tuts is a great idea!
Leslie Goerzen says
Hello Faith – this is a fantabulous tutorial. Two of my quilting buddies have iPads and this would be great for them. Thanks for sharing and I love the zipper end tip.
Rachel says
Hmmm…that is very cute. I don’t know that I could make one and then give it away. Maybe I’ll have to make two 😉 I love my iPad – it definitely deserves a pretty home. Thanks for sharing your tutorial.
Erin Cross says
Super Cute Tutorial! I’m going to make one for my Kindle!
Valerie says
Thanks so much for the clear directions on adding the ends to the zipper – I’ve been wanting to learn that! It was nice to meet you for a nanosecond at Summit!
Terry says
Great tutorial…appreciate all the tips!!! Thanks!!!
cathy says
so cool!!!!
Laura says
Cute bag and great tutorial. Thanks!
Jodi Sellers says
Very cute, will have to make one!
Cecilia says
Thanks for the tutorial. I have a Nook, but my two daughters have IPads and this would make a great Christmas gift for them. Thanks also for the giveaway.
Debbie St. Germain says
I wonder if I make one, I will get an ipad, lol.
Wonderful tutorial and nice illustrations.
Debbie
Wendi says
Oh, very nice. It seems everyone has an I-pad this year. I think I NEED one! Meanwhile, I’ll be busy making them all cases for theirs.
Thanks for the great tutorial. Merry Christmas!
Karey Haresty says
wow that looks really fun. I have never done zippers before and it looks a little scary, but the tutoiral makes it look easy. I better not say that because it will be hard now I just jenx ed my self.
anne says
Thanks for the tutorial. Now I just need to get a Kindle! What a great excuse. Thanks and have a great day!
Lyanna L. says
Great tutorial! Perhaps if I make one of these for myself, my husband will get the hint and buy me a Kindle =)
nrnoodle says
What a great gift idea. So many people have these now. I think you could adjust the measurements very easy to hold a kindle or nook. So cute. Thanks for sharing.
Pink Stitches says
Great Tutorial! I’m really enjoying these 12 days of Christmas!!
Staci says
This is so clever! Thank you so much for the tutorial. I need to go zipper shopping so I can make one!
amorette says
love your fabric choice for the main part of the cover- nice juxtaposition of old versus new technology!
Beth T. says
Your choice of colors is very striking!
Thanks for the giveaway. With Christmas coming, I could surely use a FQS gift certificate.
Nicole Gendy says
I really love your project. if anyone i know gets an ipad i will make them a case for it!
Shannon O. says
Cute and functional. I love it.
Kittt says
Your tutorial looks so easy to follow and with a zip as well and your fabric choices – oh so pretty! I’m ooking forward to seeing what else is happening over the next week.
Carla G says
What a cool tutorial! Thanks! 🙂
daisy says
wow – great tutorial thanks – just what I’ll need when I get an ipad !! and I love how you put that little strip of blue on the zip first – really great idea 🙂
Sunnybec says
Now I need to buy an Ipad…… Linda
Jodi Guerrero says
What a cute bag. I love that you add ed the zippered pocket. I wonder if I make one, show my husband and when he mentions I don’t have an I-Pad…maybe I’ll find one under the Christmas tree. Thannks again for the great tutorial.
Thank you, FQS and Fabricworm for the giveaways and a chance to win.
usairdoll(at)gmail(dot)com
Isabella says
Thank for the tutorial, now my black cover is ….. Is not at all colored!!!!!!!
Debbie says
Very Cute tutorial. Such a great gift idea. Thanks for the giveaway.
Lucy says
Looks like I’ve found a gift for my sister for Christmas! Thanks 🙂 And thanks for the giveaway!!
Dee says
Awesome tutorial and great gift for the daughter and granddaughter and daughter in law. Thank you so much!
Niki says
Thank for the tutorial – will need to make for my ipad.
Marcia K says
Great tutorial! Thanks for a fab giveaway.
Colleen says
Great fabrics! Thanks for the tutorial and giveaway.
Julie says
This has to be the best ipad case tutorial I have seen yet, I need to find out if anybody on my list has an ipad and totally make this for them! Thanks Faith!
Cecillia says
What a perfect tutorial for this holiday season. I know everyone on my list will want one…I’d better get started!! 🙂
Penny G says
Now all I need is the Ipad!
June says
I do not have an iPad (yet), but I am definately bookmarking this page so that I can make a cover for it when I do get one.
Paulette Doyle says
Thanks for the great tutorial…can you guess what ever one is going to be getting for Christmas?? haha Love it! Also thanks for the chance to win this wonderful give away!
Paulette
Carla V. says
This would make a perfect cover for my iPad,…. once I purchase it 🙂 Thanks for sharing!
EG says
If only I had an iPad to put in it!
aimee says
Cool tute – thanks so much!
Mary Burn says
Wish I had an ipad to fill this cute cover. Thanks for the tutorial.
Katie B says
This is so cute! Great Christmas gift idea (for me!).
elsa says
Thanks so much for the tutorial ~ I’ve sewn on so many zippers, I don’t even know how many ~ BUT ~ never could figure out how to do those little tabs (I know I know, but my little brain just couldn’t do it). Now I know and I’ll be using them from now on!
Margaret says
Love the case! A friend just received an I Pad for a birthday gift, and I’ve been thinking about making a cover for her. Perfect! Thanks a lot!
Norma says
wish I had an ipad or even a kindle to jazz up
Vanilla says
That is such a great tutorial! Everything is explained to the detail!!! Thanks for sharing.
Julie says
Cute iPad case. I made one out of felted wool, but it would be really nice to make one with the zip pocket like you did.
Robin says
Nice tute! Thanks!
Tammy says
Very cute! I love your fabric choices.
Sara says
This is great, now I need an Ipad!
Phyllis says
Thanks for the great tutorial!
Sue. says
Love it, so well done and photographed…must make one.
Tracey Rampling says
Now all I need is an iPad!
Amy says
Fun tutorial! I only wish I had an ipad to put in it 🙂
Brenda says
I’ve pinned your tutorial to my Pinterest board – I’ve been wanting to make something like this for my e-reader. Thanks!
Miz Karen says
Thanks for the tutorial. I’ve looking for one to make a cover for my Kindle. Christmas present for me.
lisa conant says
This is so nice….I made an iPad case, but the tutorial I used didn’t make an allowance for a cord compartment…love the zippered pouch in this one!
Alisha says
I’m hoping Santa brings me an Ipad so I’ll have to keep this tutorial in mind!
Delores Wagg says
What an awesome Ipad case!! Very trendy.
Would love to win your giveaway.
bohemiannie! art says
Thanks for the very neat IPad tutorial!
Ariane says
I love your iPad cover tutorial. Thanks for sharing it with us!!! Love it!!!
loura says
I’ll have to make one for myself.
laura says
LOVE this tutorial. thanks for the chance to win!
Janice says
Thanks for the great tute!
kristin says
What a wonderful tutorial. This is going straight on my to do list! I know several people on my list will LOVE this. Thanks for sharing.
vicki boschman says
great idea. thanks for the opportunity to win a GC
Jenny says
This is going to be my mom’s Christmas gift!! Yeah!!
Julie says
thanks for the tutorial. it’s a very cute case.
amy says
Thanks for the amazing tutorial! Makes me so excited for Christmas!
Emily says
Great tutorial! I love the little zippered pocket. I’ll have to modify this for a Kindle for my family members 🙂
Bente says
very nice, thank you!!!
Marie says
Loved the tutorial – so quick and easy.
Francine Taylor says
I LOVE this! Off to measure my nook 🙂
Tiffanie says
Adorable! I love all your tutorials they are so detailed!
Val says
Thanks, Faith for the chance! Love the tut!
Jamie says
That is a fantastic tutorial. I have a few of these I was hoping to make as holiday gifts, now I know exactly where to find the best set of instructions! Thanks for the giveaway.
What Comes Next? says
Very slick design!
Crystal Wonitoy says
Awesome giveaway! My “paddy” needs one of these!
Kim C says
Oh, you used the NASTY “z” word. But, you did it well with the little piece of added fabric! Hope many will try them with that great tip. No pads of any kind here, but can bu used and adapted for many things. Thank you for a great tut and continued blog hop fun!
Wanda Eash says
This is pretty awesome! I want to get my hubby an IPad for Christmas….Who knows – I just might make him his own holder for it. Thanks for sharing this cute idea!
Lindsay W says
What a great tutorial, with great pics and explanations!
Thanks!
Karen McMahon says
What a great project, thank you!
LJ says
Your case is so cute. What person wouldn’t love such a lovely case for their Ipod or Kindle? Your instructions are concise and should be easy to follow. Thanks.
Carol says
Nice tutorial, thanks. I would love a chance to win a gift card to my very favorite quilt shop.
Lori says
I have enjoyed your blog so much! Helpful tips/techniques/tutorials! 🙂 Thank you for a great project!
Marianne says
What a wonderful tutorial! Now all I need is an iPad. Thank you.
Lori says
Fantastic tutorial!! Now I just need an ipad… 🙂
MoeWest says
This is a wonderful gift tutorial and sure to be popular.
roccagal says
I love your blog and your tutorials are always so easy to follow! Thanks!
Janet says
Now if I only had an IPod…..
Mary on Lake Pulaski says
Great tutorial! I’ll be making one tomorrow! Thank you.
Carmel says
Looks great! I think the man in my life might like something like this for his tablet.
Mollie says
Thanks for the great tutorial! Hope to make this soon!
tusen says
Clever to make it with a pocket. I think my Kindle could use one like this 🙂
Thank you for the tutorial.
Debra L says
Thanks for the zipper help. they give me fits every time!
Elizabeth McDonald says
Such a cute project! I am loving this gift blog hop!
Susanne says
This tutorial is great! I always wanted to try inner zipper pockets for my bags. I will give it a try 🙂
Susanne
Kate R says
Perfect! My mother has been asking me to make her one for a while 🙂 Now I have just the tutorial! Thank you
Ashleigh says
Great tutorial. This would make a great gift for a guy – obviously done in more manly colours.
Jeannette says
Absolutly perfect! I need to make this and plan too, thanks for such a great tutorial!!
Robyn says
Great tutorial! Love the bright colourful fabrics you used.
cliodana says
wow this is such a great idea. My friend just ask me for an ipad case! wonderful, big thanks
Mama Spark says
I’m thinking that this would be a great gift my my DH for Christmas. His work is supplying him with an iPad shortly! Thanks for the great tute!!
Diane says
thanks for the great iPad tuturial … great holiday gift!
Marie says
Great tutorial, but I wish I had seen this sooner. I already made myself an iPad cover. Then again it wouldn’t hurt to have two;-) I LOVE the addition of the zipper on the outside. I have a thing for zippers like I have a thing for pom pom fringe…
emmy says
Love pictorial tutorials. Thank you. Your fabric choice really makes it unique.
Judith Hollies says
Great tute! This will make a v.stylish & modern gift idea. Jxo
Jolie says
Great tute…and now I *need* an ipad even more, ha!!!
Love love love your work – and thanks for the opportunity to enter such a great giveaway!
Marieke says
Thanks for the tutorial!
I do already own a pattern for Kindles/Nooks/iPads, but it’s always nice to have a variety to choose from. I know the boyfriend is eyeballing a Kindle Fire, so I may have to sew one up pretty soon this holiday season!
Dawn says
I love the way you got the zipper onto the front of the case. I might have to make one of these for my daughter who keeps dropping her iTouch. It’s needs some cushioning.
Carolyn says
Wonderful tute. Thank you so much.
Beth says
YIPEE Another gift scratched off the list!!!! Thank you, thank you, thank you! I love the fabric you used on yours. The zippered pocket is great.
meagan says
I love this! I really need to get a zipper foot for my machine. Those radios are super cute 🙂
Quilty Jen says
Great tutorial! Thanks for breaking it down to us newbies! 😉
Jessica says
great tutorial…now i really need an ipad!
Jessica says
Thanks for a great tutorial! 🙂 I wish I had an ipad, too… haha. But I’m going to bookmark this!
Jacque says
Great tutorial…really nice, clear instructions, and good photos. I can never seem to get enough light in my shots for tutorials! Love your ipad project, and thanks for the opportunity to win your giveaway!
adele armstrong says
Such a clear tutorial! Thank you! x
Peggy says
Thanks for the tutorial and a chance to win your giveaway.
Thanks.
Peggy
peggy_verdongibbs@att.net
http://keepmeinstitches-peggy.blogspot.com
Joy says
Great tutorial (and thanks for all the process pictures!)…thanks for posting it. I love your fabric choices!
Stacey says
A great tutorial – the pictures really help and the directions are clear.
Jeannie says
This was so fun! and very well written! Thank you :)))
Val Laird says
Thnks for a great tutorial and for the opportunity to enter.
Evelene Sterling says
I love this Ipad cover! Thanks for the tutorial and for a chance to win.
Becky in Georgia says
This is a FABULOUS tutorial. Thanks so much for sharing this with us! Have a great week!
Anna says
I love this! Thank you for sharing the tutorial with us, I am definitely going to use it in the near future! 🙂
Susan G says
Loved the tutorial, I finish my zippers the same way – looks so professional and neat.
Susan
ssusie.galasso@gmail.com
robin says
I need a laptop tutorial – wonder if I could just go by this with different dimensions.
Cindy says
Great tutorial- fantastic pictures and easy to follow. Thanks for sharing!!
Lori-Marie says
Hello~
Great tutorial!
I would love to win that!
Thank you for the chance and for a great giveaway!
Blessings~
Lori-Marie
Gina says
Fantastic design and tutorial! Thank you so much for taking the time to put the tutorial together!
Sandy Corey says
I too like your treatment of the zipper ends. Good idea!!!
Thanks too for the chance to be a winner.
Sincerely
Sandy
Nancy says
Just love the idea of all these wonderful handmade gifts. Thanks for the great ideas.
Lorri says
Love the tut. now I need an iPad, too. lol Thanks.
Ceryl says
I just bought a tablet and i love this tutorial. i cannot wait to shop for fabric!
corina says
Great tutorial! I love the way you finish your zipper ends – makes such a difference.
Mhairi says
Now all I need is an i-pad!
With this tutorial in those amazing colours I am convinced it is the must have for next year, writing my letter to Santa now!!! 🙂
Thanks for sharing a great tutorial
Shawna G. says
You made that look so easy. I ‘d like to give it a try. I have not yet put a zipper in anything but the zipper ends really do give it a finished and polished look. I’m learning so much (I’m a beginner) and I have lots of projects on my to-do list now. Thanks for the giveaway.
missmoozie(at)gmail(dot)com
Sabs says
The case looks amazing, I love that fabric!
Second Chance Tan says
Fab, fab, fab…………. if I knew someone with an ipad I would make them one of these xx
Kathryn says
Thanks for a tutorial that’s really easy to follow! Great fabrics too!
Nicole says
Love this tutorial!
Karen says
I love your tutorial and would love a chance to win.
Karen
Amy in VA says
The birthday fairy next week ‘may’ be bringing me an iPad. Would I jinx it if I started on the cover now? Thanks for the chance to win.
Brynn says
What a great tutorial! Thanks!
dyanne says
great tutorial. am getting the new kindle pad when it comes out in november, and i’ll have this case ready to go.
Elaine says
Thanks for this great tutorial. My granddaughter just got a tablet and this would be ideal for her. Now I just have to get busy and make one for her.
Diane says
That is super cute! Now I need to go get an iPad so I can make one for me. 😉 thanks for sharing! And for the great giveaway. I am loving this blog tour of tutorials!
Katie says
This is a great tutorial! I’m hoping to get either an ipad or a kindle soon, so I pinned this to make a cover once I get one 🙂 thank you!
Jenn says
Hmm… I dunno, that has a zipper in it and zippers are scary. That actually looks like a really nice way to handle a zipper. I might just be able to do it. This is a really nice tutorial. Hopefully I’ll have a chance to try it out. Thanks for the tutorial and the chance to win.
jennhgray at gmail dot com
Shannyn says
Oooh! Can’t wait to make one of these for a pressie! Thanks very much for the tutorial & giveaway!
Deb says
I’m enjoying the blog hop. thanks so much for participating.
Mom C says
Cute, clean and a really good idea. Thanks.
Sonia Parham says
Awesome tutorial and giveaway! 🙂
Jen S says
Nice tutorial! Like the zipper pocket!
Dona Reynolds says
Let’s me think. How many of these will I have to make? 9 gkids, 4 kids and a husband and their husbands and wives…..
Shannon says
I love that fabric! I WISH I had an iPad. *swoon* I often steal my boyfriend’s but he would kill me if I removed the boring black cover he has on it. Men. 😛
Zoe says
This is great! My parents are about to get Kindles, this would be a great christmas present 🙂
booklogged says
Loved learning about the end tabs on the zipper. Thanks for the great tutorial.
Peach Rainbow says
Thanks for the lovely tutorial!
Jodi R says
Great tutorial. Seems to be pretty well explained. Might see if I can adapt it for a non iPad use as I don’t have one.
Mary Ann B says
Great tutorial! Thank you, I have several to make for gifts now!
And thank you for the give away!
Mary Ann
Justine says
great tutorial – thanks for the lesson!
Carmen says
Love this project. I will need it when I get my i-pad(fingers crossed)!
Carolyn says
Thanks for the pattern and the give away. I love how the ends were added to the zipper it a good idea.
Margaret says
This is one of the best online tutorials I have seen.
Oh, if only I had a iPad but am sure I can adjust the pattern to fit other things.
Margaret
Aggiequilter says
Joining the Hop late, I’m catching up !
I don’t have an iPad (yet) but my daughter does, she’ll love this ! Thanks for such a good, clear tutorial !
Patricia says
I love the fabrics you used; very fun!
Victoria Paige says
This is an awesome tutorial. I am loving the zipper on the front for extra storage.
Jo aka The Hungry Crafter says
Fantastic tutorial — so well organized! And I can’t wait to try some of those zipper ends myself — I have an embroidered pouch WIP that’s right at that step!!!
Aimee says
I love the tutorial! Very easy to understand!
GG says
Thanks for this neat iPad cover.
Donna Joy says
Thanks for the iPad case pattern, I sure love my iPad.
superstitches says
Love the way you did the zipper. Looks very professional.
Helen LeBrett says
Great idea and great tutorial!! Thanks!!!
Jeanne says
Real cute ipod case! Thanks for the chance to win.
Jessica says
Cool ipad case…now I just need an ipad!
Melissa says
Greast case and super simple instructions:) Thanks for the chance to win some great fabric and for the inspiration this morning:)
Sarah @ FairyFace Designs says
Fab tutorial, really love this!
Celine says
Thanks for the lovely tutorial. Just saw your post about the Christmas stocking, I’ll see if I can find enough time to make one to send.
Lindsay says
thanks for the big clear pictures. And, that is great fabric!
Beth T. says
Get this: after months of discussing whether we “need” an iPad, my sweetheart is now planning a trip to Russia. Discussion closed. Now I need to get stitching accoutrements for the ever-so-necessary tablet. Thanks for the tute.
Nancy says
I love the fabrics that you used for this pouch! Thanks for sharing the tutorial and giveaway with us.
Thearica Burroughs says
Perfect tute for those with these gadgets!
Melissa says
Thank you for the fabulous tutorial!
Bethany says
I love the fabric you chose for the front.
Angel says
The colors are beautiful. Thanks for the tutorial and contest!
Nicole Gray says
hmmmm I kinda want an I-Pad this case is way cool.
Denise says
I have been looking for an ipad case that I actually liked, and this is it!! Thanks for the tutorial! So can I make my own gift?? OF Course I can!
Thanks again
jenne says
what a great blog hop. I have been looking for some holiday ideas- thanks for all the great ones.
Desiree @ Wee Share says
This is SO cute! Thanks for sharing the project with us 🙂
Sue says
this is totally awesome! My first blog hop and i am totally blown away! I want to make every project listed!
Jenniffier says
Very cute great idea adding a zipped pocket!
Linda says
I cannot wait to get started on this! 4 out of 5 in my family have iPads and they will make awesome gifts. Thanks for sharing!
Kathy MacKie says
Sweet Tutorial, aren’t we lucky as quilters that we can create unique and one of a kind items we can use in our daily life. Thanks.
Sandra says
Great tutorial!! Thanks!
Stephanie says
I don’t have any family members with an ipad but maybe I could adjust the pattern to fit a laptop? Thanks for the idea and for the chance to win!
Karin says
That just couldn’t be cuter!!
Dianne Neale says
I don’t have an ipad, but I love this and I’m sure I could use it for something. The fabric is to die for!
craftytammie says
great tutorial! now i just need an i-pad…
Judi says
Great project, and I love the fabric you used! If only I had an i-pad 🙂
Kate says
I absolutely love this little case — adapted a bit for my friend’s little notebook, it will be just the perfect thing. Thanks!
Shannon Q says
This is EXACTLY what I’ve been googling for!! Off to start working on it…THANK YOU!!!!
Fran says
Can’t miss . Thanks for doing all the work for us with a good tutorial for the IPad.
Lauren says
My brother just got an iPad so this will be a perfect Christmas present! Looks great!
sarah says
thanks for this tutorial.
it would definitely have to be a gift, since i am not a proud owner of an ipad. 🙁
and, thanks for the chance to win the giveaway!!
Tara K says
Nice iPad Case Tute. Great job!
bonnie says
my grand daughter would love the case
Outside Inspiration says
Thank you – a great project!
Sam says
great case.
Crystal says
Thank you for hosting this giveaway!! <3 Please enter me!
Crystal at domesticbutnotmartha dot com
Nancy Sue says
Great tutorial.!!!!!!!!!!!!!!!!!!!!!!!!!!!! My phone is screaming for this case!!
Jen B says
I think I’m going to try to adapt this for our Nook!
Karen O says
Great tutorial. I will be bookmarking it for the future.
Kell says
Thanks for th me tutorial! I’ve been wanting to make a new case for my nook.
Ruth S. says
What a nifty case! Great tutorial and super cute fabric!